- AI with Python Tutorial
- Home
- AI with Python β Primer Concepts
- AI with Python β Getting Started
- AI with Python β Machine Learning
- AI with Python β Data Preparation
- Supervised Learning: Classification
- Supervised Learning: Regression
- AI with Python β Logic Programming
- Unsupervised Learning: Clustering
- Natural Language Processing
- AI with Python β NLTK Package
- Analyzing Time Series Data
- AI with Python β Speech Recognition
- AI with Python β Heuristic Search
- AI with Python β Gaming
- AI with Python β Neural Networks
- Reinforcement Learning
- AI with Python β Genetic Algorithms
- AI with Python β Computer Vision
- AI with Python β Deep Learning
- AI with Python Resources
- AI with Python β Quick Guide
- AI with Python β Useful Resources
- AI with Python β Discussion
- Selected Reading
- UPSC IAS Exams Notes
- Developer's Best Practices
- Questions and Answers
- Effective Resume Writing
- HR Interview Questions
- Computer Glossary
- Who is Who
AI with Python β Computer Vision
Computer vision is concerned with modeling and replicating human vision using computer software and hardware. In this chapter, you will learn in detail about this.
Computer Vision
Computer vision is a discipline that studies how to reconstruct, interrupt and understand a 3d scene from its 2d images, in terms of the properties of the structure present in the scene.
Computer Vision Hierarchy
Computer vision is divided into three basic categories as following −
Low-level vision − It includes process image for feature extraction.
Intermediate-level vision − It includes object recognition and 3D scene interpretation
High-level vision − It includes conceptual description of a scene like activity, intention and behavior.
Computer Vision Vs Image Processing
Image processing studies image to image transformation. The input and output of image processing are both images.
Computer vision is the construction of explicit, meaningful descriptions of physical objects from their image. The output of computer vision is a description or an interpretation of structures in 3D scene.
Applications
Computer vision finds applications in the following fields −
Robotics
Localization-determine robot location automatically
Navigation
Obstacles avoidance
Assembly (peg-in-hole, welding, painting)
Manipulation (e.g. PUMA robot manipulator)
Human Robot Interaction (HRI): Intelligent robotics to interact with and serve people
Medicine
Classification and detection (e.g. lesion or cells classification and tumor detection)
2D/3D segmentation
3D human organ reconstruction (MRI or ultrasound)
Vision-guided robotics surgery
Security
- Biometrics (iris, finger print, face recognition)
- Surveillance-detecting certain suspicious activities or behaviors
Transportation
- Autonomous vehicle
- Safety, e.g., driver vigilance monitoring
Industrial Automation Application
- Industrial inspection (defect detection)
- Assembly
- Barcode and package label reading
- Object sorting
- Document understanding (e.g. OCR)
Installing Useful Packages
For Computer vision with Python, you can use a popular library called OpenCV (Open Source Computer Vision). It is a library of programming functions mainly aimed at the real-time computer vision. It is written in C++ and its primary interface is in C++. You can install this package with the help of the following command −
pip install opencv_python-X.X-cp36-cp36m-winX.whl
Here X represents the version of Python installed on your machine as well as the win32 or 64 bit you are having.
If you are using the anaconda environment, then use the following command to install OpenCV −
conda install -c conda-forge opencv
Reading, Writing and Displaying an Image
Most of the CV applications need to get the images as input and produce the images as output. In this section, you will learn how to read and write image file with the help of functions provided by OpenCV.
OpenCV functions for Reading, Showing, Writing an Image File
OpenCV provides the following functions for this purpose −
imread() function − This is the function for reading an image. OpenCV imread() supports various image formats like PNG, JPEG, JPG, TIFF, etc.
imshow() function − This is the function for showing an image in a window. The window automatically fits to the image size. OpenCV imshow() supports various image formats like PNG, JPEG, JPG, TIFF, etc.
imwrite() function − This is the function for writing an image. OpenCV imwrite() supports various image formats like PNG, JPEG, JPG, TIFF, etc.
Example
This example shows the Python code for reading an image in one format − showing it in a window and writing the same image in other format. Consider the steps shown below −
Import the OpenCV package as shown −
import cv2
Now, for reading a particular image, use the imread() function −
image = cv2.imread('image_flower.jpg')
For showing the image, use the imshow() function. The name of the window in which you can see the image would be image_flower.
cv2.imshow('image_flower',image)
cv2.destroyAllwindows()
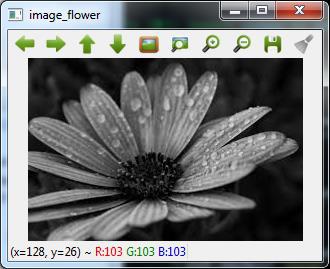
Now, we can write the same image into the other format, say .png by using the imwrite() function −
cv2.imwrite('image_flower.png',image)
The output True means that the image has been successfully written as .png file also in the same folder.
True
Note − The function destroyallWindows() simply destroys all the windows we created.
Color Space Conversion
In OpenCV, the images are not stored by using the conventional RGB color, rather they are stored in the reverse order i.e. in the BGR order. Hence the default color code while reading an image is BGR. The cvtColor() color conversion function in for converting the image from one color code to other.
Example
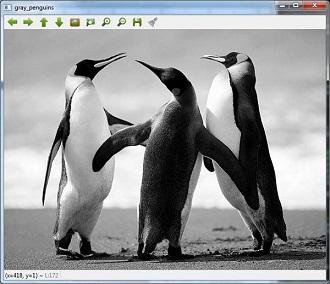
Consider this example to convert image from BGR to grayscale.
Import the OpenCV package as shown −
import cv2
Now, for reading a particular image, use the imread() function −
image = cv2.imread('image_flower.jpg')
Now, if we see this image using imshow() function, then we can see that this image is in BGR.
cv2.imshow('BGR_Penguins',image)
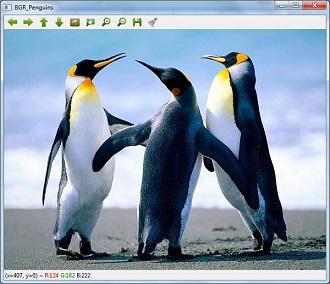
Now, use cvtColor() function to convert this image to grayscale.
image = cv2.cvtColor(image,cv2.COLOR_BGR2GRAY)
cv2.imshow('gray_penguins',image)
Edge Detection
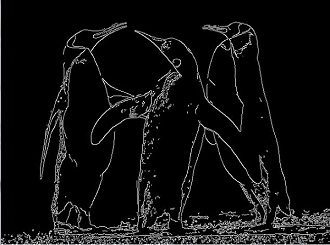
Humans, after seeing a rough sketch, can easily recognize many object types and their poses. That is why edges play an important role in the life of humans as well as in the applications of computer vision. OpenCV provides very simple and useful function called Canny()for detecting the edges.
Example
The following example shows clear identification of the edges.
Import OpenCV package as shown −
import cv2
import numpy as np
Now, for reading a particular image, use the imread() function.
image = cv2.imread('Penguins.jpg')
Now, use the Canny () function for detecting the edges of the already read image.
cv2.imwrite(βedges_Penguins.jpgβ,cv2.Canny(image,200,300))
Now, for showing the image with edges, use the imshow() function.
cv2.imshow(βedgesβ, cv2.imread(ββedges_Penguins.jpgβ))
This Python program will create an image named edges_penguins.jpg with edge detection.
Face Detection
Face detection is one of the fascinating applications of computer vision which makes it more realistic as well as futuristic. OpenCV has a built-in facility to perform face detection. We are going to use the Haar cascade classifier for face detection.
Haar Cascade Data
We need data to use the Haar cascade classifier. You can find this data in our OpenCV package. After installing OpenCv, you can see the folder name haarcascades. There would be .xml files for different application. Now, copy all of them for different use and paste then in a new folder under the current project.
Example
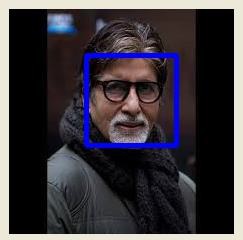
The following is the Python code using Haar Cascade to detect the face of Amitabh Bachan shown in the following image −

Import the OpenCV package as shown −
import cv2
import numpy as np
Now, use the HaarCascadeClassifier for detecting face −
face_detection=
cv2.CascadeClassifier('D:/ProgramData/cascadeclassifier/
haarcascade_frontalface_default.xml')
Now, for reading a particular image, use the imread() function −
img = cv2.imread('AB.jpg')
Now, convert it into grayscale because it would accept gray images −
gray = cv2.cvtColor(img, cv2.COLOR_BGR2GRAY)
Now, using face_detection.detectMultiScale, perform actual face detection
faces = face_detection.detectMultiScale(gray, 1.3, 5)
Now, draw a rectangle around the whole face −
for (x,y,w,h) in faces:
   img = cv2.rectangle(img,(x,y),(x+w, y+h),(255,0,0),3)
cv2.imwrite('Face_AB.jpg',img)
This Python program will create an image named Face_AB.jpg with face detection as shown
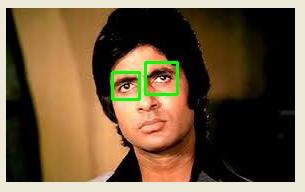
Eye Detection
Eye detection is another fascinating application of computer vision which makes it more realistic as well as futuristic. OpenCV has a built-in facility to perform eye detection. We are going to use the Haar cascade classifier for eye detection.
Example
The following example gives the Python code using Haar Cascade to detect the face of Amitabh Bachan given in the following image −

Import OpenCV package as shown −
import cv2
import numpy as np
Now, use the HaarCascadeClassifier for detecting face −
eye_cascade = cv2.CascadeClassifier('D:/ProgramData/cascadeclassifier/haarcascade_eye.xml')
Now, for reading a particular image, use the imread() function
img = cv2.imread('AB_Eye.jpg')
Now, convert it into grayscale because it would accept grey images −
gray = cv2.cvtColor(img, cv2.COLOR_BGR2GRAY)
Now with the help of eye_cascade.detectMultiScale, perform actual face detection
eyes = eye_cascade.detectMultiScale(gray, 1.03, 5)
Now, draw a rectangle around the whole face −
for (ex,ey,ew,eh) in eyes:
   img = cv2.rectangle(img,(ex,ey),(ex+ew, ey+eh),(0,255,0),2)
cv2.imwrite('Eye_AB.jpg',img)
This Python program will create an image named Eye_AB.jpg with eye detection as shown −
