
- DB2 Tutorial
- Home
- DB2 - Introduction
- DB2 - Server Installation
- DB2 - Instance
- DB2 - Databases
- DB2 - Bufferpools
- DB2 - Tablespaces
- DB2 - Storagegroups
- DB2 - Schemas
- DB2 - Data Types
- DB2 - Tables
- DB2 - Alias
- DB2 - Constraints
- DB2 - Indexes
- DB2 - Triggers
- DB2 - Sequences
- DB2 - Views
- DB2 with XML
- DB2 - Backup and Recovery
- DB2 - Database Security
- DB2 - Roles
- DB2 - LDAP
- DB2 Useful Resources
- DB2 - Questions and Answers
- DB2 - Quick Guide
- DB2 - Useful Resources
- DB2 - Discussion
- Selected Reading
- UPSC IAS Exams Notes
- Developer's Best Practices
- Questions and Answers
- Effective Resume Writing
- HR Interview Questions
- Computer Glossary
- Who is Who
DB2 Quick Guide
DB2 Introduction
This chapter describes history of DB2, its versions, editions and their respective features.
Overview
DB2 is a database product from IBM. It is a Relational Database Management System (RDBMS). DB2 is designed to store, analyze and retrieve the data efficiently. DB2 product is extended with the support of Object-Oriented features and non-relational structures with XML.
History
Initially, IBM had developed DB2 product for their specific platform. Since year 1990, it decided to develop a Universal Database (UDB) DB2 Server, which can run on any authoritative operating systems such as Linux, UNIX, and Windows.
Versions
For IBM DB2, the UDB current version is 10.5 with the features of BLU Acceleration and its code name as 'Kepler'. All the versions of DB2 till today are listed below:
| Version | Code Name |
|---|---|
| 3.4 | Cobweb |
| 8.1, 8.2 | Stinger |
| 9.1 | Viper |
| 9.5 | Viper 2 |
| 9.7 | Cobra |
| 9.8 | It added features with Only PureScale |
| 10.1 | Galileo |
| 10.5 | Kepler |
Data server editions and features
Depending upon the requirement of needful features of DB2, the organizations select appropriate DB2 version. The following table shows DB2 server editions and their features:
| Editions | Features |
|---|---|
| Advanced Enterprise Server Edition and Enterprise Server Edition (AESE / ESE) | It is designed for mid-size to large-size business organizations. Platform - Linux, UNIX, and Windows. Table partitioning High Availability Disaster Recovery (HARD) Materialized Query Table (MQTs) Multidimensional Clustering (MDC) Connection concentrator Pure XML Backup compression Homogeneous Federations |
| Workgroup Server Edition (WSE) | It is designed for Workgroup or mid-size business organizations. Using this WSE you can work with - High Availability Disaster Recovery (HARD) Online Reorganization Pure XML Web Service Federation support DB2 Homogeneous Federations Homogeneous SQL replication Backup compression |
| Express -C | It provides all the capabilities of DB2 at zero charge. It can run on any physical or virtual systems with any size of configuration. |
| Express Edition | It is designed for entry level and mid-size business organizations. It is full featured DB2 data server. It offers only limited services. This Edition comes with - Web Service Federations DB2 homogeneous federations Homogeneous SQL Replications Backup compression |
| Enterprise Developer Edition | It offers only single application developer. It is useful to design, build and prototype the applications for deployment on any of the IBM server. The software cannot be used for developing applications. |
DB2 Server Installation
This chapter describes installation steps of DB2 server.
Introduction
You can download the DB2 Server trial version or purchase the product license from www.ibm.com. There are two separate DB2 servers available for downloading, depending upon the size of operating system, on which it is intended to execute. For example, if you want to download a DB2 server for 32bit Linux or UNIX operating system, then you need to download a 32 bit DB2 server. The same applies for 64bit DB2 server.
Hardware requirements
Processor : Minimum Core 2Duo
Ram : 1GB minimum
Hard disk : 30GB minimum
Software requirements
Before installing the DB2 server, your system needs to get ready with the required software on it. For Linux, you need to install “libstdc++6.0”.
Checking system compatibility
Before installing DB2 Server, you need to verify if your system is compatible with the DB2 server. For confirming the compatibility, you need to call 'db2prereqcheck' command on command console.
Installing DB2 on Linux operating system
Open the Terminal and set the db2 installation image folder path on console using “CD <DB2 installation folder>” command. Then type “./db2prereqcheck” command, which confirms the compatibility of your system with DB2 server.
./db2prereqcheck
Figure-1 shows the compatibility requirements of Linux operating system and hardware system.
Follow the given steps for installing DB2 on your Linux system:
- Open the terminal.
- Login as root user.
- Open DB2 Installation folder.
- Type “./db2setup” and press Enter.
This process will start execution of DB2 server setup.
Type “./db2setup” and press Enter on root terminal to start setup process of DB2 Server.
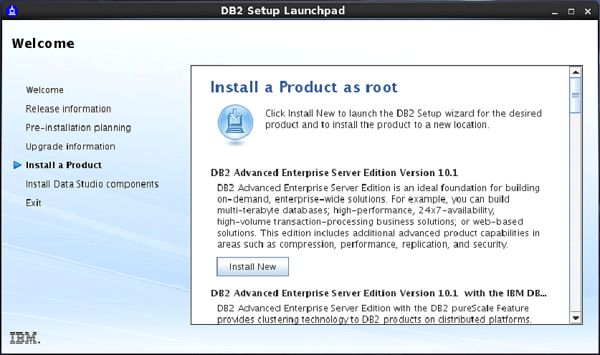
On doing so, the “Set up Launch Pad” screen appears. [Figure-2]
On Setup Launch pad page, select “Install a Product” option from left side menu. Select option “DB2 Advanced Enterprise Server Edition”. Select “Install New” Button.
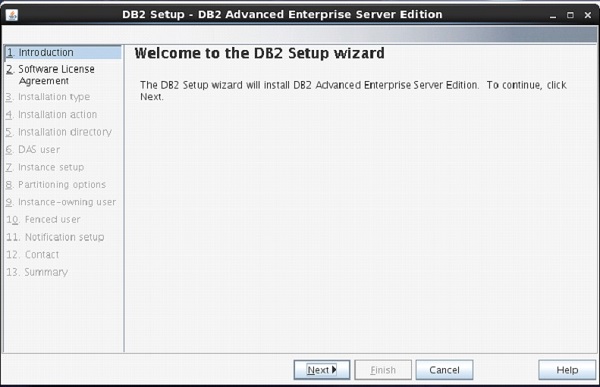
A new frame appears with name “DB2 setup wizard”. Click “Next”. [Figure-3]
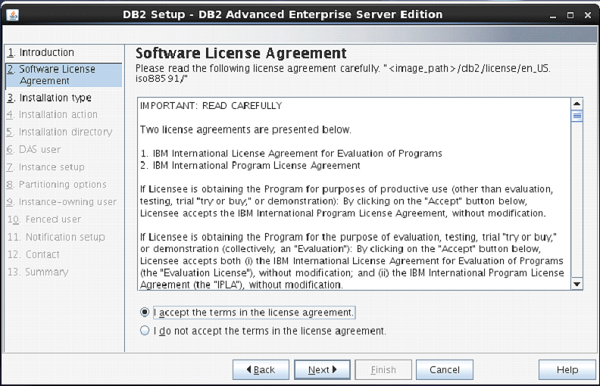
The next screen appears with DB2 license agreement. Select “I accept the terms…” Click “Next”. [Figure-4]
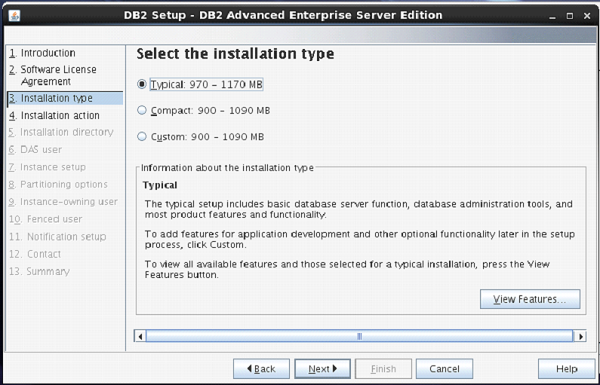
Next screen comes up with offer of Installation type, which is set to “Typical” by default.
Keep the same selection. Click “Next”. [Figure-5]
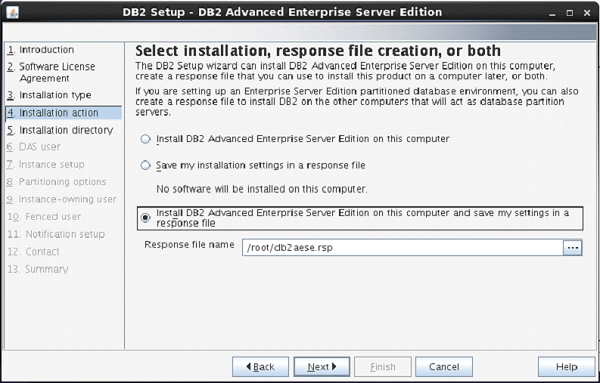
The next screen appears with installation action.
Select “Install DB2 Advanced Enterprise Server Edition…”
Click “Next”. [Figure-6]
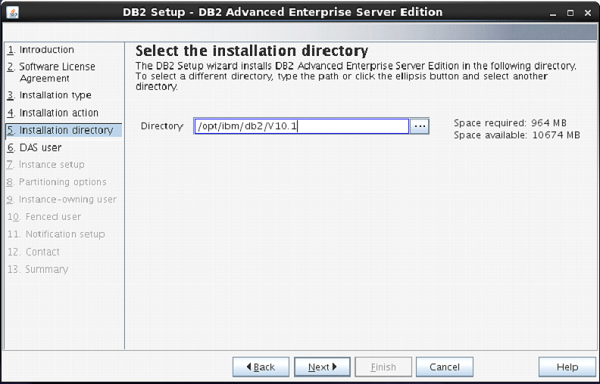
On the next screen, the setup program asks for selection of installation directory.
Keep the default and click “Next”.
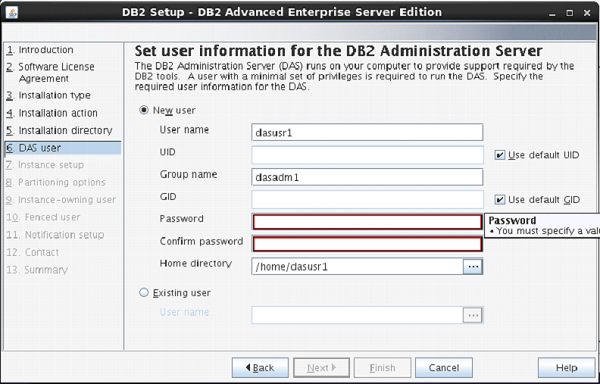
The next screen comes up with the user authentication. Enter your password for “dasusr1” user.
(Your password can be identical to username so that it is convenient to remember.)
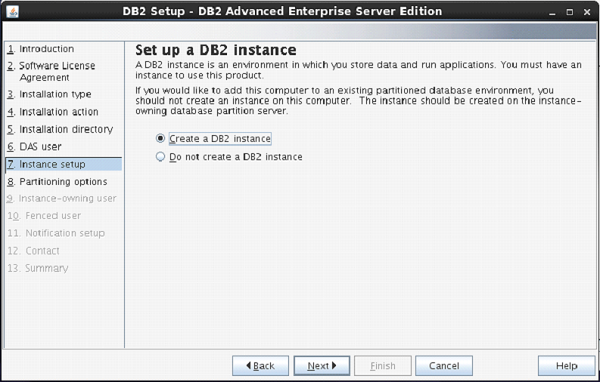
On the following screen, the setup asks you for creation of DB2 Server Instance.
Here, it is creating a DB2 instance with name “db2inst1”.
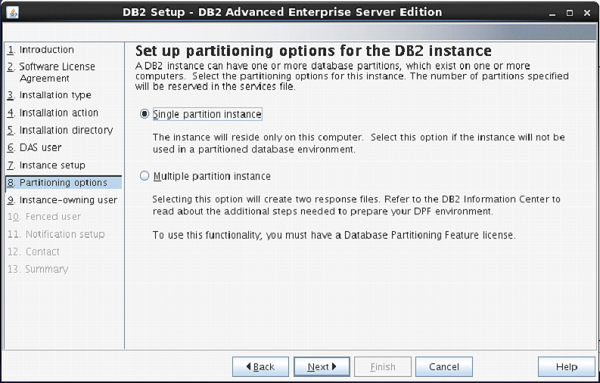
The next screen asks you the number of partitions you require for your default instance.
You have a choice of “single or Multiple” partitions.
Select “single partition instance”. Click “next”.
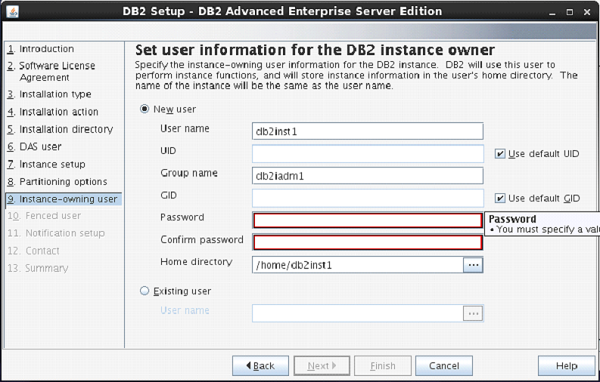
On the next screen, the setup asks you for authentication for DB2 instance being created.
Here, by default username is created as “db2inst1”. You can enter password same as username.
Click “Next”.
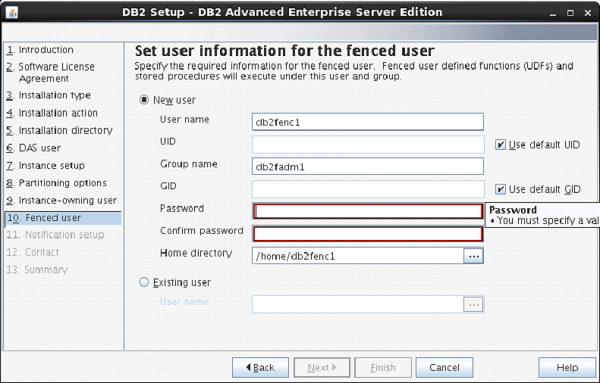
On the next screen, the setup asks to enter authentication information for “db2fenc” user.
Here, you can enter password same as username.
Click “Next”.
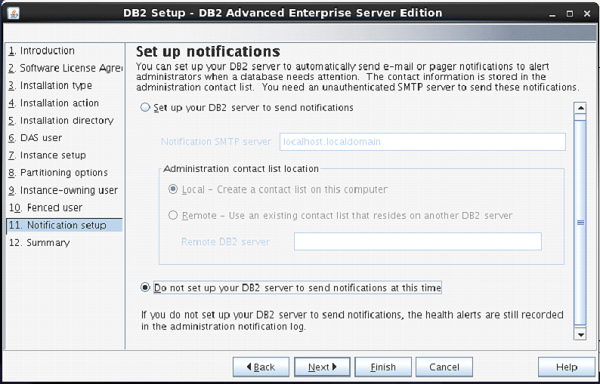
On the next screen, you can select “Do not setup your db2 server to send notifications at this time” option.
Click ”Next”.

The next screen shows you the information about db2 setup.
Click “Finish”.
The DB2 Installation procedure is complete at this stage.
Verifying DB2 installation
You need to verify the installation of DB2 server for its usefulness. On completing the DB2 Server installation, logout from current user mode and login to “db2inst1” user. In “db2inst1” user environment, you can open terminal and execute the following commands to verify if your db2 product is installed properly or not.
db2level
This command shows the current version and service level of the installed DB2 product for current instance.
Syntax:
db2level
Example:
db2level
Output:
DB21085I Instance "db2inst2" uses "64" bits
And DB2 code release "SQL10010" with level
identifier "0201010E". Informational tokens
are "DB2 v10.1.0.0", "s120403",
"LINUXAMD64101", and Fix Pack "0".
Product is installed at "/home/db2inst2/sqllib".
db2licm
This command shows all the license related information of our DB2 Product.
Syntax:
db2licm <parameter>
Example:
db2licm -l
Output:
Product name:                     "DB2 Advanced Enterprise Server Edition"
License type:                     "Trial"
Expiry date:                      "10/02/2014"
Product identifier:               "db2aese"
Version information:              "10.1"
Product name:                     "DB2 Connect Server"
License type:                     "Trial"
Expiry date:                      "10/02/2014"
Product identifier:               "db2consv"
Version information:              "10.1"
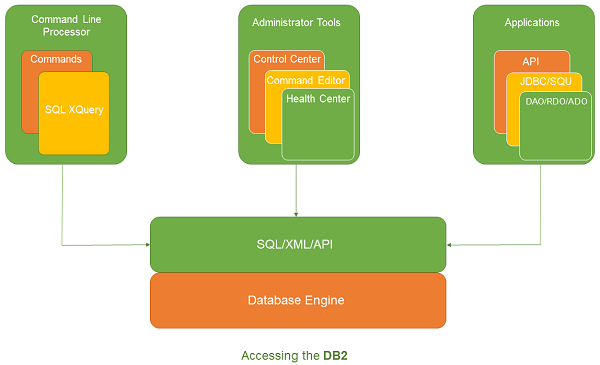
Command Line Processor (CLP)
The CLP can be started in one of the three modes:
Command mode: In this mode, each command and SQL statement must be prefixed by “db2”. For example, query “db2 activate database sample”.
Interactive input mode: you can launch this mode by using the “db2” command. Here, you can pass SQL statements without prefix. For example, “activate database sample”.
Batch mode: Here, you need to create a script file, which contains all SQL queries of requirements and save the file with “.db2” extension. You can call this in command line using syntax “db2 –tf <filename.db2>”.
DB2 Instance
Introduction
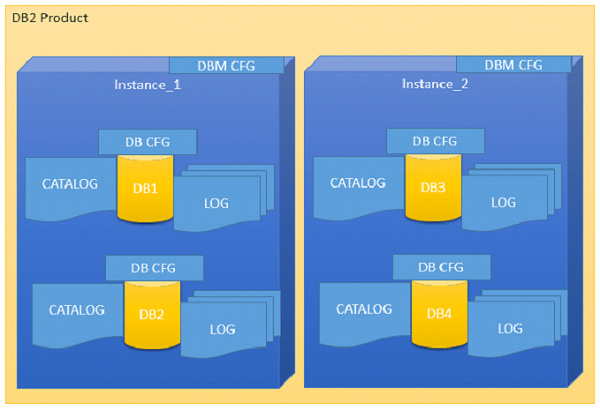
An Instance is a logical environment for DB2 Database Manager. Using instance, you can manage databases. Depending on our requirements, you can create multiple instances on one physical machine. The contents of Instance directory are:
- Database Manager Configuration file
- System Database Directory
- Node Directory
- Node Configuration File [db2nodes.cfg]
- Debugging files, dump files
For DB2 Database Server, the default instance is “DB2”. It is not possible to change the location of Instance directory after its creation. An instance can manage multiple databases. In an instance, each database has a unique name, its own set of catalog tables, configurations files, authorities and privileges.
Architecture of instance in DB2 product
Multiple instances
You can create multiple instances in one DB2Server on Linux, UNIX and Windows. It is possible to install multiple DB2Servers on a physical machine.
Creating instance on Linux
You can create multiple instances on Linux and UNIX if DB2 Server is installed as root user. An instance can run simultaneously on Linux and UNIX independently. You can work within a single instance of the database manager at a time.
An Instance folder contains database configuration files and folders. The Instance directory is stored at different locations on Windows depending on the operating system versions.
Listing instances
The following command is used to list instances:
db2ilist
This command lists all the instances that are available on a system.
Syntax:
db2ilist
Example:[To see how many instances are created in DB2 copy]
db2ilist
Output:
db2inst1
db2inst2
db2inst3
Instance environment commands
These commands are useful to work with arrangement of instance in the DB2 CLI.
Get instance
This command shows details of the currently running instance.
Syntax:
db2 get instance
Example:[To see the current instance which activated the current user]
db2 get instance
Output:
The current database manager instance is : db2inst1
Set instance
To start or stop the database manager of an instance on DB2 UDB, the following command is executed for the current instance.
Syntax:
set db2instance=<instance_name>
Example:[ To arrange the “db2inst1” environment to current user]
set db2instance=db2inst1
db2start
Using this command, you can start an instance. Before this, you need to run “set instance”.
Syntax:
db2start
Example:[To start an instance]
db2start
Output:
SQL1063N DB2START processing was successful
db2stop
Using this command you can stop a running instance.
Syntax:
db2stop
Output:
SQL1064N DB2STOP processing was successful.
Creating an instance
Let us see how to create a new instance.
db2icrt
If you want to create a new instance, you need to log in with root. Instance id is not a root id or a root name.
Here are the steps to create a new instance:
Step1: Create an operating system user for instance.
Syntax:
useradd -u <ID> -g <group name> -m -d <user location> <user name>
-p <password>
Example: [To create a user for instance with name ‘db2inst2’ in group ‘db2iadm1’ and password ‘db2inst2’]
useradd -u 1000 -g db2iadm1 -m -d /home/db2inst2 db2inst2 -p db2inst2
Step2: Go to the DB2 instance directory in root user for create new instance.
Location:
cd /opt/ibm/db2/v10.1/instance
Step3: Create instance using the syntax below:
Syntax:
./db2icrt -s ese -u <inst id> <instance name>
Example: [To create a new instance ‘db2inst2’ in user ‘db2inst2’ with the features of ‘ESE’ (Enterprise Server Edition)]
./db2icrt -s ese -u db2inst2 db2inst2
Output:
DBI1446I The db2icrt command is running, please wait.
 ….
 …..
DBI1070I Program db2icrt completed successfully.
Arranging communication port and host for an instance
Edit the /etc/services file and add the port number. In the syntax given below, ‘inst_name’ indicates the Instance name and ‘inst_port’ indicates port number of instance.
Syntax:
db2c_<inst name> <inst_port>/tcp
Example: [Adding ‘50001/tcp’ port number for instance ‘db2inst2’ with variable ‘db2c_db2inst2’ in ‘services’ file]
db2c_db2inst2 50001/tcp
Syntax 1: [Update Database Manager Configuration with service name. The following syntax ‘svcename’ indicates the instance service name and ‘inst_name’ indicates the instance name]
db2 update database manager configuration using svcename db2c_&<inst_name>
Example 1: [Updating DBM Configuration with variable svcename with value ‘db2c_db2inst2’ for instance ‘db2inst2’
db2 update database manager configuration using svcename db2c_db2inst2
Output
DB20000I The UPDATE DATABASE MANAGER CONFIGURATION command completed successfully.
Syntax 2: set the “tcpip” communication protocol for the current instance
db2set DB2COMM=tcpip
Syntax 3: [Stopping and starting current instance to get updated values from database manager configuration]
db2stop
db2start
Updating an instance
You can update an instance using following command:
db2iupdt
This command is used to update the instance within the same version release. Before executing this command, you need to stop the instance database manager using “db2stop” command. The syntax below “inst_name” indicates the previous released or installed db2 server instance name, which you want to update to newer release or installed db2 server version.
Syntax 1: To update an instance in normal mode
db2iupdt <inst_name>
Example1:
./db2iupdt db2inst2
Syntax 2: To update an instance in debugging mode
db2iupdt -D <inst_name>
Example
db2iupdt -D db2inst2
Upgrading an instance
You can upgrade an instance from previous version of DB2 copy to current newly installed version of DB2 copy.
db2iupgrade
On Linux or UNIX system, this command is located in DB2DIR/instance directory. In the following syntaxes, “inst_name” indicates the previous version DB2 instance and “inst_username” indicates the current installed version DB2 copy instance user.
Syntax 2:
db2iupgrade -d -k -u <inst_username> <inst_name>
Example:
db2iupgrade -d -k -u db2inst2 db2inst2
Command Parameters:
-d : Turns debugging mode on.
-k : Keeps the pre-upgrade instance type if it is supported in the DB2 copy, from where you are running this command.
If you are using the Super User (su) on Linux for db2iupgrade command, you must issue the “su” command with the “-” option.
Dropping an instance
You can drop or delete the instance, which was created by “db2icrt” command.
db2idrop
On Linux and UNIX operating system, this command is located in the DB2_installation_folder/instance directory.
Syntax: [in the following syntax, ‘inst_username’ indicates username of instance and ‘inst_name’ indicates instance name]
db2idrop -u <inst_username> <inst_name>
Example: [To drop db2inst2]
./db2idrop -u db2inst2 db2inst2
Using other commands with instance
Command to find out which DB2 instance we are working on now.
Syntax 1: [to check the current instance activated by database manager]
db2 get instance
Output:
The current database manager instance is: db2inst1
Syntax 2: [To see the current instance with operating bits and release version]
db2pd -inst | head -2
Example:
db2pd -inst | head -2
Output:
Instance db2inst1 uses 64 bits and DB2 code release SQL10010
Syntax 3: [To check the name of currently working instance]
db2 select inst_name from sysibmadm.env_inst_info
Example:
db2 select inst_name from sysibmadm.env_inst_info
Output:
INST_NAME  --------------------------------------
db2inst1
1 record(s) selected.
Syntax: [To set a new instance as default]
db2set db2instdef=<inst_name> -g
Example: [To array newly created instance as a default instance]
db2set db2instdef=db2inst2 -g
DB2 Databases
This chapter describes creating, activating and deactivating the databases with the associated syntax.
Database architecture
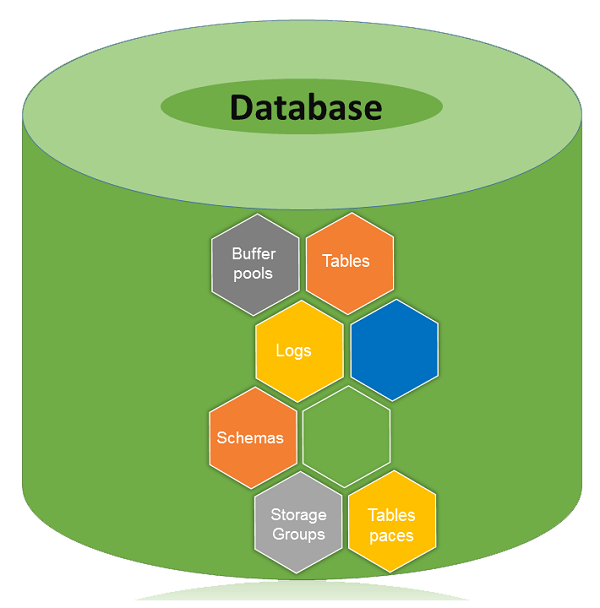
A database is a collection of Tables, Schemas, Bufferpools, Logs, Storage groups and Tablespaces working together to handle database operations efficiently.
Database directory
Database directory is an organized repository of databases. When you create a database, all the details about database are stored in a database directory, such as details of default storage devices, configuration files, and temporary tables list etc.
Partition global directory is created in the instance folder. This directory contains all global information related to the database. This partition global directory is named as NODExxxx/SQLyyy, where xxxx is the data partition number and yyy is the database token.
In the partition-global directory, a member-specific directory is created. This directory contains local database information. The member-specific directory is named as MEMBERxxxx where xxxx is a member number. DB2 Enterprise Server Edition environment runs on a single member and has only one member specific directory. This member specific directory is uniquely named as MEMBER0000.
Partitioned global directory
Directory Location : <instance>/NODExxx/SQLxxx
The partition-global directory contains database related files as listed below.
- Global deadlock write-to-file event monitoring files
- Table space information files [SQLSPCS.1, SQLSPCS.2]
- Storage group control files [SQLSGF.1, SQLSGF.2]
- Temporary table space container files. [/storage path/
/T0000011/C000000.TMP/SQL00002.MEMBER0001.TDA] - Global Configuration file [SQLDBCONF]
- History files [DB2RHIST.ASC, DB2RHIST.BAK, DB2TSCHG.HIS, DB2TSCHG.HIS]
- Logging-related files [SQLOGCTL.GLFH.1, SQLOGCTL.GLFH.2]
- Locking files [SQLINSLK, SQLTMPLK]
- Automatic Storage containers
Member specific directory
Directory location : /NODExxxx/SQLxxxx/MEMBER0000
This directory contains:
- Objects associated with databases
- Buffer pool information files [SQLBP.1, SQLBP.2]
- Local event monitoring files
- Logging-related files [SQLOGCTL.LFH.1, SQLOGCTL.LFH.2, SQLOGMIR.LFH].
- Local configuration files
- Deadlocks event monitor file. The detailed deadlock events monitor files are stored in the database directory of the catalog node in case of ESE and partitioned database environment.
Creating database
You can create a database in instance using the “CREATE DATABASE” command. All databases are created with the default storage group “IBMSTOGROUP”, which is created at the time of creating an instance. In DB2, all the database tables are stored in “tablespace”, which use their respective storage groups.
The privileges for database are automatically set as PUBLIC [CREATETAB, BINDADD, CONNECT, IMPLICIT_SCHEMA, and SELECT], however, if the RESTRICTIVE option is present, the privileges are not granted as PUBLIC.
Creating non-restrictive database
This command is used to create a non-restrictive database.
Syntax: [To create a new Database. ‘database_name’ indicates a new database name, which you want to create.]
db2 create database <database name>
Example: [To create a new non-restrictive database with name ‘one’]
db2 create database one
Output:
DB20000I The CREATE DATABASE command completed successfully.
Creating restrictive database
Restrictive database is created on invoking this command.
Syntax: [In the syntax below, “db_name” indicates the database name.]
db2 create database <db_name> restrictive
Example: [To create a new restrictive database with the name ‘two’]
db2 create database two restrictive
Creating database with different user defined location
Create a database with default storage group “IBMSTOGROUP” on different path. Earlier, you invoked the command “create database” without any user-defined location to store or create database at a particular location. To create the database using user- defined database location, the following procedure is followed:
Syntax: [In the syntax below, ‘db_name’ indicates the ‘database name’ and ‘data_location’ indicates where have to store data in folders and ‘db_path_location’ indicates driver location of ‘data_location’.]
db2 create database '<db_name>' on '<data location>' dbpath on '<db_path_location>'
Example: [To create database named ‘four’, where data is stored in ‘data1’ and this folder is stored in ‘dbpath1’]
db2 create database four on '/data1' dbpath on '/dbpath1'
Viewing local or system database directory files
You execute this command to see the list of directories available in the current instance.
Syntax:
db2 list database directory
Example:
db2 list database directory
Output:
 System Database Directory
 Number of entries in the directory = 6
 Database 1 entry:
 Database alias                       = FOUR
 Database name                        = FOUR
 Local database directory             =
 /home/db2inst4/Desktop/dbpath
 Database release level               = f.00
 Comment                              =
 Directory entry type                 = Indirect
 Catalog database partition number    = 0
 Alternate server hostname            =
 Alternate server port number         =
Database 2 entry:
Database alias                       = SIX
Database name                        = SIX
Local database directory             = /home/db2inst4
Database release level               = f.00
Comment                              =
Directory entry type                 = Indirect
Catalog database partition number    = 0
Alternate server hostname            =
Alternate server port number         =
Activating database
This command starts up all necessary services for a particular database so that the database is available for application.
Syntax:[‘db_name’ indicates database name]
db2 activate db <db_name>
Example: [Activating the database ‘one’]
db2 activate db one
Deactivating database
Using this command, you can stop the database services.
Syntax:
db2 deactivate db <db_name>
Example: [To Deactivate database ‘one’]
db2 deactivate db one
Connecting to database
After creating a database, to put it into use, you need to connect or start database.
Syntax:
db2 connect to <database name>
Example: [To Connect Database one to current CLI]
db2 connect to one
Output:
 Database Connection Information
 Database server        = DB2/LINUXX8664 10.1.0
 SQL authorization ID   = DB2INST4
 Local database alias   = ONE
Verifying if database is restrictive
To check if this database is restrictive or not, here is the syntax:
Syntax: [In the following syntax, ‘db’ indicates Database, ‘cfg’ indicates configuration, ‘db_name’ indicates database name]
db2 get db cfg for <db_name> | grep -i restrict
Example: [To check if ‘one’ database is restricted or not]
db2 get db cfg for one | grep -i restrict
Output:
Restrict access = NO
Configuring the database manager and the database
Instance configuration (Database manager configuration) is stored in a file named 'db2system' and the database related configuration is stored in a file named 'SQLDBCON'. These files cannot be edited directly. You can edit these files using tools which call API. Using the command line processor, you can use these commands.
Database Manager Configuration Parameters
Syntax: [To get the information of Instance Database manager]
db2 get database manager configurationOR
db2 get dbm cfg
Syntax: [To update instance database manager]
db2 update database manager configurationOR
db2 update dbm cfg
Syntax: [To reset previous configurations]
db2 reset database manager configurationOR
db2 reset dbm cfg
Database Configuration Parameters
Syntax: [To get the information of Database]
db2 get database configurationOR
db2 get db cfg
Syntax: [To update the database configuration]
db2 update database configurationOR
db2 update db cfg
Syntax: [To reset the previously configured values in database configuration
db2 reset database configurationOR
db2 reset db cfg
Syntax: [To check the size of Current Active Database]
db2 "call get_dbsize_info(?,?,?,-1)"
Example: [To verify the size of Currently Activate Database]
db2 "call get_dbsize_info(?,?,?,-1)"
Output:
Value of output parameters
--------------------------
Parameter Name  : SNAPSHOTTIMESTAMP
Parameter Value : 2014-07-02-10.27.15.556775
Parameter Name  : DATABASESIZE
Parameter Value : 105795584
Parameter Name  : DATABASECAPACITY
Parameter Value : 396784705536
Return Status = 0
Estimating space required for database
To estimate the size of a database, the contribution of the following factors must be considered:
- System Catalog Tables
- User Table Data
- Long Field Data
- Large Object (LOB) Data
- Index Space
- Temporary Work Space
- XML data
- Log file space
- Local database directory
- System files
Checking database authorities
You can use the following syntax to check which database authorities are granted to PUBLIC on the non-restrictive database.
Step 1: connect to database with authentication user-id and password of instance.
Syntax: [To connect to database with username and password]
db2 connect to <db_name> user <userid> using <password>
Example: [To Connect “one” Database with the user id ‘db2inst4’ and password ‘db2inst4’]
db2 connect to one user db2inst4 using db2inst4
Output:
 Database Connection Information
 Database server        = DB2/LINUXX8664 10.1.0
 SQL authorization ID   = DB2INST4
 Local database alias   = ONE
Step2: To verify the authorities of database.
Syntax: [The syntax below shows the result of authority services for current database]
db2 "select substr(authority,1,25) as authority, d_user, d_group,
d_public, role_user, role_group, role_public,d_role from table(
sysproc.auth_list_authorities_for_authid ('public','g'))as t
order by authority"
Example:
db2 "select substr(authority,1,25) as authority, d_user, d_group,
d_public, role_user, role_group, role_public,d_role from table(
sysproc.auth_list_authorities_for_authid ('PUBLIC','G'))as t
order by authority"
Output:
AUTHORITY                 D_USER D_GROUP D_PUBLIC ROLE_USER ROLE_GROUP ROLE_PUBLIC D_ROLE
------------------------- ------ ------- -------- --------- ---------- ----------- ------
ACCESSCTRL                *      *       N        *         *          N           *
BINDADD                   *      *       Y        *         *          N           *
CONNECT                   *      *       Y        *         *          N           *
CREATETAB                 *      *       Y        *         *          N           *
CREATE_EXTERNAL_ROUTINE   *      *       N        *         *          N           *
CREATE_NOT_FENCED_ROUTINE *      *       N        *         *          N           *
CREATE_SECURE_OBJECT      *      *       N        *         *          N           *
DATAACCESS                *      *       N        *         *          N           *
DBADM                     *      *       N        *         *          N           *
EXPLAIN                   *      *       N        *         *          N           *
IMPLICIT_SCHEMA           *      *       Y        *         *          N           *
LOAD                      *      *       N        *         *          N           *
QUIESCE_CONNECT           *      *       N        *         *          N           *
SECADM                    *      *       N        *         *          N           *
SQLADM                    *      *       N        *         *          N           *
SYSADM                    *      *       *        *         *          *           *
SYSCTRL                   *      *       *        *         *          *           *
SYSMAINT                  *      *       *        *         *          *           *
SYSMON                    *      *       *        *         *          *           *
WLMADM                    *      *       N        *         *          N           *
20 record(s) selected.
Dropping Database
Using the Drop command, you can remove our database from instance database directory. This command can delete all its objects, table, spaces, containers and associated files.
Syntax: [To drop any database from an instance]
db2 drop database <db_name>
Example: [To drop ‘six’ database from instance]
db2 drop database six
Output:
DB20000I The DROP DATABASE command completed successfully
DB2 Bufferpools
This chapter introduces you to Bufferpools in the database.
Introduction
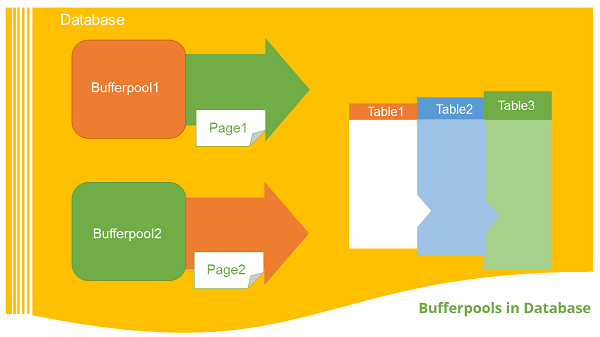
The bufferpool is portion of a main memory space which is allocated by the database manager. The purpose of bufferpools is to cache table and index data from disk. All databases have their own bufferpools. A default bufferpool is created at the time of creation of new database. It called as “IBMDEFAULTBP”. Depending on the user requirements, it is possible to create a number of bufferpools. In the bufferpool, the database manager places the table row data as a page. This page stays in the bufferpool until the database is shutdown or until the space is written with new data. The pages in the bufferpool, which are updated with data but are not written onto the disk, are called “Dirty” pages. After the updated data pages in the bufferpool are written on the disk, the bufferpool is ready to take another data.
Relationship between tablespaces and bufferpools
Each table space is associated with a specific buffer pool in a database. One tablespace is associated with one bufferpool. The size of bufferpool and tablespace must be same. Multiple bufferpools allow you to configure the memory used by the database to increase its overall performance.
Bufferpool sizes
The size of the bufferpool page is set when you use the “CREATE DATABASE” command. If you do not specify the page size, it will take default page size, which is 4KB. Once the bufferpool is created, it is not possible to modify the page size later
Listing the available bufferpools in the current database directory
Syntax: [The syntax below shows all available bufferpools in database]
db2 select * from syscat.bufferpools
Example: [To see available bufferpools in current database]
db2 select * from syscat.bufferpools
Output:
BPNAME      BUFFERPOOLID DBPGNAME   NPAGES      PAGESIZE    ESTORE
NUMBLOCKPAGES BLOCKSIZE   NGNAME
------------------------------------------------------------
IBMDEFAULTBP
 1 -
 -2        4096 N                  0           0 -

 1 record(s) selected.
Creating the bufferpool
To create a new bufferpool for database server, you need two parameters namely, “bufferpool name” and “size of page”. The following query is executed to create a new bufferpool.
Syntax: [In the syntax below,‘bp_name’ indicates bufferpool name and ‘size’ indicates size for page you need to declare for bufferpools (4K,8K,16K,32K)]
db2 create bufferpool <bp_name> pagesize <size>
Example: [To create a new bufferpool with name “bpnew” and size “8192”(8Kb).]
db2 create bufferpool bpnew pagesize 8192
Output
DB20000I The SQL command completed successfully.
Dropping the bufferpool
Before dropping the bufferpool, it is required to check if any tablespace is assigned to it.
Syntax: [To drop the bufferpool]
drop bufferpool <bp_name>
Example: [To drop ‘bpnew’ named bufferpool]
db2 drop bufferpool bpnew
Output
DB20000I The SQL command completed successfully.
DB2 Tablespaces
This chapter describes the tablespaces in detail
Introduction
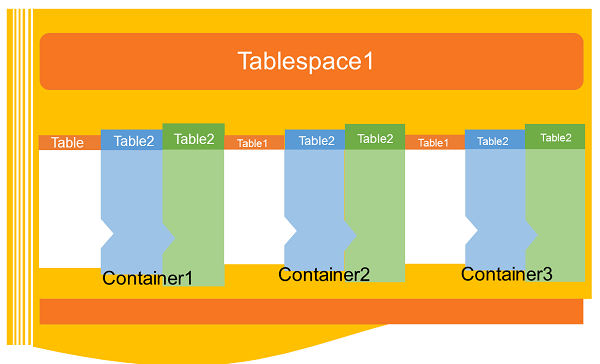
A table space is a storage structure, it contains tables, indexes, large objects, and long data. It can be used to organize data in a database into logical storage group which is related with where data stored on a system. This tablespaces are stored in database partition groups
Benefits of tablespaces in database
The table spaces are beneficial in database in various ways given as follows:
Recoverability: Tablespaces make backup and restore operations more convenient. Using a single command, you can make backup or restore all the database objects in tablespaces.
Automatic storage Management: Database manager creates and extends containers depending on the needs.
Memory utilization: A single bufferpool can manage multiple tablespaces. You can assign temporary tablespaces to their own bufferpool to increase the performance of activities such as sorts or joins.
Container
Tablespaces contains one or more containers. A container can be a directory name, a device name, or a filename. In a database, a single tablespace can have several containers on the same physical storage device. If the tablespace is created with automatic storage tablespace option, the creation and management of containers is handled automatically by the database manager. If it is not created with automatic storage tablespace option, you need to define and manage the containers yourself.
Default tablespaces
When you create a new database, the database manager creates some default tablespaces for database. These tablespace is used as a storage for user and temporary data. Each database must contain at least three tablespaces as given here:
- Catalog tablespace
- User tablespace
- Temporary tablespace
Catalog tablespace: It contains system catalog tables for the database. It is named as SYSCATSPACE and it cannot be dropped.
User tablespace: This tablespace contains user-defined tables. In a database, we have one default user tablespace, named as USERSPACE1. If you do not specify user-defined tablespace for a table at the time you create it, then the database manager chooses default user tablespace for you.
Temporary tablespace: A temporary tablespace contains temporary table data. This tablespace contains system temporary tablespaces or user temporary tablespace.
System temporary tablespace holds temporary data required by the database manager while performing operation such as sorts or joins. A database must have at least one system temporary tablespace and it is named as TEMPSPACE1. It is created at the time of creating the database. User temporary tablespace holds temporary data from tables. It is created with DECLARE GLOBAL TEMPORARY TABLE or CREATE GLOBAL TEMPORARY TABLE statement. This temporary tablespace is not created by default at the time of database creation.
Tablespaces and storage management:
Tablespaces can be setup in different ways, depending on how you want to use them. You can setup the operating system to manage tablespace allocation, you can let the database manager allocate space or you can choose automatic allocation of tablespace for your data.
The following three types of managed spaces are available:
System Managed Space (SMS): The operating system’s file system manager allocates and manages the space where the table is stored. Storage space is allocated on demand. This model consists of files representing database objects. This tablespace type has been deprecated in Version 10.1 for user-defined tablespaces, and it is not deprecated for catalog and temporary tablespaces.
Database Managed Space (DMS): The Database Server controls the storage space. Storage space is pre- allocated on the file system based on container definition that you specify when you create the DMS table space. It is deprecated from version 10.1 fix pack 1 for user-defined tablespaces, but it is not deprecated for system tablespace and temporary tablespace.
Automatic Storage Tablespace: Database server can be managed automatically. Database server creates and extends containers depend on data on database. With automatic storage management, it is not required to provide container definitions. The database server looks after creating and extending containers to make use of the storage allocated to the database. If you add storage space to a storage group, new containers are automatically created when the existing container reach their maximum capacity. If you want to use the newly-added storage immediately, you can rebalance the tablespace.
Page, table and tablespace size:
Temporary DMS and automatic storage tablespaces, the page size you choose for your database determines the maximum limit for the tablespace size. For table SMS and temporary automatic storage tablespaces, the page size constrains the size of table itself. The page sizes can be 4kb, 8kb, 16kb or 32kb.
| Tablespace type | 4K page size limit | 8K page size limit | 16K page size limit | 32K page size limit |
|---|---|---|---|---|
| DMS, non-temporary automatic storage tablespace regular | 64G | 128G | 256G | 512G |
| DMS, temporary DMS and non- temporary automatic storage table space large | 1892G | 16384G | 32768G | 65536G |
DB2 Storagegroups
This chapter describes the Database Storagegroups.

Introduction
A set of Storage paths to store database table or objects, is a storage group. You can assign the tablespaces to the storage group. When you create a database, all the tablespaces take default storagegorup. The default storage group for a database is ‘IBMSTOGROUP’. When you create a new database, the default storage group is active, if you pass the “AUTOMATIC STOGROUP NO” parameter at the end of “CREATE DATABASE” command. The database does not have any default storage groups.
Listing storagegroups
You can list all the storagegroups in the database.
Syntax: [To see the list of available storagegroups in current database]
db2 select * from syscat.stogroups
Example: [To see the list of available storagegorups in current database]
db2 select * from syscat.stogroups
Creating a storagegroup
Here is a syntax to create a storagegroup in the database:
Syntax: [To create a new stogroup. The ‘stogropu_name’ indicates name of new storage group and ‘path’ indicates the location where data (tables) are stored]
db2 create stogroupon ‘path’
Example: [To create a new stogroup ‘stg1’ on the path ‘data1’ folder]
db2 create stogroup stg1 on ‘/data1’
Output:
DB20000I The SQL command completed succesfully
Creating tablespace with stogroup
Here is how you can create a tablespace with storegroup:
Syntax: [To create a new tablespace using existed storage group]
db2 create tablespace <tablespace_name> using stogroup <stogroup_name>
Example: [To create a new tablespace named ‘ts1’ using existed storage group ‘stg1’]
db2 create tablespace ts1 using stogroup stg1
Output:
DB20000I The SQL command completed succesfully
Altering a storagegroup
You can alter the location of a storegroup by using following syntax:
Syntax: [To shift a storage group from old location to new location]
db2 alter stogroupadd ‘location’, ‘location’
Example: [To modify location path from old location to new location for storage group named ‘sg1’]
db2 alter stogroup sg1 add ‘/path/data3’, ‘/path/data4’
Dropping folder path of storagegroup
Before dropping folder path of storagegroup, you can add new location for the storagegroup by using alter command.
Syntax: [To drop old path from storage group location]
db2 alter stogroupdrop ‘/path’
Example: [To drop storage group location from ‘stg1’]
db2 alter stogroup stg1 drop ‘/path/data1’
Rebalancing a tablespace
Rebalancing the tablespace is required when we create a new folder for storagegroup or tablespaces while the transactions are conducted on the database and the tablespace becomes full. Rebalancing updates database configuration files with new storagegroup.
Syntax: [To rebalance the tablespace from old storage group path to new storage group]
db2 alter tablspace <ts_name> rebalance
Example: [To rebalance]
db2 alter tablespace ts1 rebalance
Renaming a storagegroup
Syntax: [To modify the name of existing storage name]
db2 rename stogroup <old_stg_name> to <new_stg_name>
Example: [To modify the name of storage group from ‘sg1’ to new name ‘sgroup1’]
db2 rename stogroup sg1 to sgroup1
Dropping a storage group
Step 1: Before dropping any storagegroup, you can assign some different storagegroup for tablespaces.
Syntax: [To assign another storagegroup for table space.]
db2 alter tablspace <ts_name> using stogroup <another sto_group_name>
Example: [To change from one old stogroup to new stogroup named ‘sg2’ for tablespace ‘ts1’]
db2 alter tablespace ts1 using stogroup sg2
Step 2:
Syntax: [To drop the existing stogroup]
db2 drop stogorup <stogroup_name>
Example: [To drop stogroup ‘stg1’ from database]
db2 drop stogroup stg1
DB2 Schemas
This chapter introduces and describes the concept of Schema.
Introduction
A schema is a collection of named objects classified logically in the database.
In a database, you cannot create multiple database objects with same name. To do so, the schema provides a group environment. You can create multiple schemas in a database and you can create multiple database objects with same name, with different schema groups.
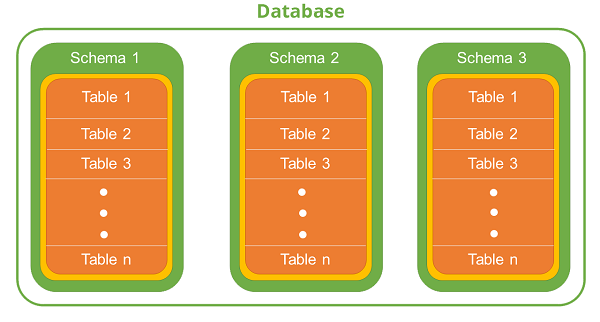
A schema can contain tables, functions, indices, tablespaces, procedures, triggers etc. For example, you create two different schemas named as “Professional” and “Personal” for an “employee” database. It is possible to make two different tables with the same name “Employee”. In this environment, one table has professional information and the other has personal information of employee. In spite of having two tables with the same name, they have two different schemas “Personal” and “Professional”. Hence, the user can work with both without encountering any problem. This feature is useful when there are constraints on the naming of tables.
Let us see few commands related to Schema:
Getting currently active schema
Syntax:
db2 get schema
Example: [To get current database schema]
db2 get schema
Setting another schema to current environment
Syntax:
db2 set schema=<schema_name>
Example: [To arrange ‘schema1’ to current instance environment]
db2 set schema=schema1
Creating a new Schema
Syntax: [To create a new schema with authorized user id]
db2 create schema <schema_name> authroization <inst_user>
Example: [To create “schema1” schema authorized with ‘db2inst2”]
db2 create schema schema1 authorization db2inst2
Exercise
Let us create two different tables with same name but two different schemas. Here, you create employee table with two different schemas, one for personal and the other for professional information.
Step 1: Create two schemas.
Schema 1: [To create schema named professional]
db2 create schema professional authorization db2inst2
Schema 2: [To create schema named personal]
db2 create schema personal authorization db2inst2
Step 2: Create two tables with the same name for Employee details
Table1: professional.employee
[To create a new table ‘employee’ in the database using schema name ‘professional’]
db2 create table professional.employee(id number, name
varchar(20), profession varchar(20), join_date date,
salary number);
Table2: personal.employee
[To create a new table ‘employee’ in the same database, with schema name ‘personal’]
db2 create table personal.employee(id number, name
varchar(20), d_birth date, phone bigint, address
varchar(200));
After executing these steps, you get two tables with same name ’employee’, with two different schemas.
DB2 Data Types
This chapter introduces various data types used in DB2.
Introduction
In DB2 Database tables, each column has its own data type depending on developer’s requirements. The data type is said to be type and range of the values in columns of a table.
Built-in data types
- Datetime
- TIME: It represents the time of the day in hours, minutes and seconds.
- TIMESTAMP: It represents seven values of the date and time in the form of year, month, day, hours, minutes, seconds and microseconds.
- DATE: It represents date of the day in three parts in the form of year, month and day.
- String
- Character
- CHAR (fixed length): Fixed length of Character strings.
- Varying length
- VARCHAR: Varying length character strings.
- CLOB: large object strings, you use this when a character string might exceed the limits of the VARCHAR data type.
- Graphic
- GRAPHIC
- Fixed length: Fixed length graphic strings that contains double-byte characters
- Varying length
- VARGRAPHIC: Varying character graphic string that contains double bye characters.
- DBCLOB: large object type
- Binary
- BLOB (varying length): binary string in large object
- BOOLEAN: In the form of 0 and 1.
- Signed numeric
- Exact
- Binary integer
- SMALLINT [16BIT]: Using this you can insert small int values into columns
- INTEGER [32BIT]: Using this you can insert large int values into columns
- BIGINT [64BIT]: Using this you can insert larger int values into columns
- Decimal
- DECIMAL (packed)
- DECFLOAT (decimal floating point): Using this, you can insert decimal floating point numbers
- Approximate
- Floating points
- REAL (single precision): Using this data type, you can insert single precision floating point numbers.
- DOUBLE (double precision): Using this data type, you can insert double precision floating point numbers.
- eXtensible Mark-up Language
- XML: You can store XML data into this data type column.
DB2 Tables
Tables are logical structure maintained by Database manager. In a table each vertical block called as column (Tuple) and each horizontal block called as row (Entity). The collection of data stored in the form of columns and rows is known as a table. In tables, each column has different data type. Tables are used to store persistent data.
Type of tables
- Base Tables: They hold persistent data. There are different kinds of base tables, including:
- Regular Tables: General purpose tables, Common tables with indexes are general purpose tables.
- Multidimensional Clustering Table (MDC): This type of table physically clustered on more than one key, and it used to maintain large database environments. These type of tables are not supported in DB2 pureScale.
- Insert time clustering Table (ITC): Similar to MDC tables, rows are clustered by the time they are inserted into the tables. They can be partitioned tables. They too, do not support pureScale environment.
- Range-Clustered tables Table (RCT): These type of tables provide fast and direct access of data. These are implemented as sequential clusters. Each record in the table has a record ID. These type of tables are used where the data is clustered tightly with one or more columns in the table. This type of tables also do not support in DB2 pureScale.
- Partitioned Tables: These type of tables are used in data organization schema, in which table data is divided into multiple storage objects. Data partitions can be added to, attached to and detached from a partitioned table. You can store multiple data partition from a table in one tablespace.
- Temporal Tables: History of a table in a database is stored in temporal tables such as details of the modifications done previously.
- Temporary Tables: For temporary work of different database operations, you need to use temporary tables. The temporary tables (DGTTs) do not appear in system catalog, XML columns cannot be used in created temporary tables.
- Materialized Query Tables: MQT can be used to improve the performance of queries. These types of tables are defined by a query, which is used to determine the data in the tables.
Creating Tables
The following syntax creates table:
Syntax: [To create a new table]
db2 create table <schema_name>.<table_name>
(column_name column_type....) in <tablespace_name>
Example: We create a table to store “employee” details in the schema of “professional”. This table has “id, name, jobrole, joindate, salary” fields and this table data would be stored in tablespace “ts1”.
db2 create table professional.employee(id int, name
varchar(50),jobrole varchar(30),joindate date,
salary double) in ts1
Output:
DB20000I The SQL command completed successfully.
Listing table details
The following syntax is used to list table details:
Syntax: [To see the list of tables created with schemas]
db2 select tabname, tabschema, tbspace from syscat.tables
Example: [To see the list of tables in the current database]
db2 select tabname, tabschema, tbspace from syscat.tables
Output:
TABNAME      TABSCHEMA     TBSPACE
------------ ------------- --------
EMPLOYEE     PROFESSIONAL    TS1


 1 record(s) selected.
Listing columns in a table
The following syntax lists columns in a table:
Syntax: [To see columns and data types of a table]
db2 describe table <table_name>
Example: [To see the columns and data types of table ‘employee’]
db2 describe table professional.employee
Output:
             Data type                   Column
Column name  schema    Data type name    Length    Scale Nulls
------ ----- --------- ----------------- --------- ----- ------
ID           SYSIBM    INTEGER             4         0     Yes
NAME         SYSIBM    VARCHAR             50        0     Yes
JOBROLE      SYSIBM    VARCHAR             30        0     Yes
JOINDATE     SYSIBM    DATE                4         0     Yes
SALARY       SYSIBM    DOUBLE              8         0     Yes

  5 record(s) selected.
Hidden Columns
You can hide an entire column of a table. If you call “select * from” query, the hidden columns are not returned in the resulting table. When you insert data into a table, an “INSERT” statement without a column list does not expect values for any implicitly hidden columns. These type of columns are highly referenced in materialized query tables. These type of columns do not support to create temporary tables.
Creating table with hidden column
The following syntax creates table with hidden columns:
Syntax: [To create a table with hidden columns]
db2 create table <tab_name> (col1 datatype,col2 datatype
implicitly hidden)
Example: [To create a ‘customer’ table with hidden columns ‘phone’]
db2 create table professional.customer(custid integer not
null, fullname varchar(100), phone char(10)
implicitly hidden)
Inserting data values in table
The following syntax inserts values in the table:
Syntax: [To insert values into a table]
db2 insert into <tab_name>(col1,col2,...)
 values(val1,val2,..)
Example: [To insert values in ‘customer’ table]
db2 insert into professional.customer(custid, fullname, phone)
values(100,'ravi','9898989')


db2 insert into professional.customer(custid, fullname, phone)
values(101,'krathi','87996659')


db2 insert into professional.customer(custid, fullname, phone)
values(102,'gopal','768678687')
Output:
DB20000I The SQL command completed successfully.
Retrieving values from table
The following syntax retrieves values from the table:
Syntax: [To retrieve values form a table]
db2 select * from <tab_name>
Example: [To retrieve values from ‘customer’ table]
db2 select * from professional.customer
Output:
CUSTID      FULLNAME
----------- ------------------------
        100 ravi

        101 krathi

        102 gopal

  3 record(s) selected.
Retrieving values from a table including hidden columns
The following syntax retrieves values from selected columns:
Syntax: [To retrieve selected hidden columns values from a table]
db2 select col1,col2,col3 from <tab_name>
Example: [To retrieve selected columns values result from a table]
db2 select custid,fullname,phone from professional.customer
Output:
CUSTID  FULLNAME    PHONE
------- ---------   ------------
100     ravi        9898989

101     krathi      87996659

102     gopal       768678687

  3 record(s) selected.
If you want to see the data in the hidden columns, you need to execute “DESCRIBE” command.
Syntax:
db2 describe table <table_name> show detail
Example:
db2 describe table professional.customer show detail
Output:
Column name     Data type schema     Data type name  Column
           column    Partitionkey  code
                                       Length   Scale    Nulls
number     sequence      page     Hidden      Default
--------------- -------------------- --------------- -------- ----
---- -------- ---------- ------------- -------- ----------- ------
---
CUSTID          SYSIBM               INTEGER         4        0
No       0          0         0        No
FULLNAME        SYSIBM               VARCHAR         100      0
Yes      1          0        1208     No

PHONE           SYSIBM               CHARACTER       10       0
Yes      2          0             1208     Implicitly

3 record(s) selected.
Altering the type of table columns
You can modify our table structure using this “alter” command as follows:
Syntax:
db2 alter table <tab_name> alter column <col_name> set data type <data_type>
Example: [To modify the data type for column “id” from “int” to “bigint” for employee table]
db2 alter table professional.employee alter column id set data type bigint
Output::
DB20000I The SQL command completed successfully.
Altering column name
You can change column name as shown below:
Syntax: [To modify the column name from old name to new name of a table]
db2 alter table <tab_name> rename column <old_name> to <new_name>
Example: [To modify the column name from “fullname” to “custname” in “customers” table.]
db2 alter table professional.customer rename column fullname to custname
Dropping the tables
To delete any table, you need to use the “DROP” command as follows:
Syntax:
db2 drop table <tab_name>
Example: [To drop customer table form database]
db2 drop table professional.customers
To delete the entire hierarchy of the table (including triggers and relation), you need to use “DROP TABLE HIERARCHY” command.
Syntax:
db2 drop table hierarchy <tab_name>
Example: [To drop entire hierarchy of a table ‘customer’]
db2 drop table hierarchy professional.customers
DB2 Alias
This chapter describes the creation of alias and retrieving data using alias of database objects.
Introduction
Alias is an alternative name for database objects. It can be used to reference the database object. You can say, it is a nick name for database objects. Alias are defined for the objects to make their name short, thereby reducing the query size and increasing readability of the query.
Creating database object aliases
You can create database object alias as shown below:
Syntax:
db2 create alias <alias_name> for <table_name>
Example: Creating alias name for table “professional.customer” table
db2 create alias pro_cust for professional.customer
If you pass “SELECT * FROM PRO_CUST” or “SELECT * FROM PROFESSIONAL.CUSTOMER” the database server will show the same result.
Syntax: [To retrieve values from a table directly with schema name]
db2 select * from <schema_name>.<table_name>
Example: [To retrieve values from table customer]
db2 select * from professional.customer
Output:
CUSTID  FULLNAME    PHONE
------- ---------   ------------
100     ravi        9898989
101     krathi      87996659
102     gopal       768678687

  3 record(s) selected.
Retrieving values using alias name of the table
You can retrieve values from database using alias name as shown below:
Syntax: [To retrieve values from table by calling alias name of the table]
db2 select * from <alias_name>
Example: [To retrieve values from table customer using alias name]
db2 select * from pro_cust
Output:
CUSTID  FULLNAME    PHONE
------- ---------   ------------
100     ravi        9898989
101     krathi      87996659
102     gopal       768678687

  3 record(s) selected.
DB2 Constraints
This chapter describes various constraints in the database.
Introduction
To enforce database integrity, a set of rules is defined, called constraints. The constraints either permit or prohibit the values in the columns.
In a Real time database activities, the data should be added with certain restrictions. For example, in a sales database, sales-id or transaction-id should be unique. The constraints types are:
- NOT NULL
- Unique
- Primary key
- Foreign Key
- Check
- Informational
Constraints are only associated with tables. They are applied to only particular tables. They are defined and applied to the table at the time of table creation.
Explanation of each constraint:
NOT NULL
It is a rule to prohibit null values from one or more columns within the table.
Syntax:
db2 create table <table_name>(col_name col_type not null,..)
Example: [To create a sales table, with four columns (id, itemname, qty, price) in this adding “not null” constraints to all columns to avoid forming any null cell in the table.]
db2 create table shopper.sales(id bigint not null, itemname
varchar(40) not null, qty int not null,price double not null)
Inserting NOT NULL values into table
You can insert values in the table as shown below:
Example: [ERRORoneous Query]
db2 insert into shopper.sales(id,itemname,qty)
values(1,'raagi',12)
Output: [Correct query]
DB21034E  The command was processed as an SQL statement because
it was not a

valid Command Line Processor command.  During SQL processing
it returned:

SQL0407N  Assignment of a NULL value to a NOT NULL column
"TBSPACEID=5,

TABLEID=4, COLNO=3" is not allowed.  SQLSTATE=23502
Example: [Correct query]
db2 insert into shopper.sales(id,itemname,qty,price)
values(1,'raagi',12, 120.00)

db2 insert into shopper.sales(id,itemname,qty,price)
values(1,'raagi',12, 120.00)
Output:
DB20000I The SQL command completed successfully.
Unique constraints
Using these constraints, you can set values of columns uniquely. For this, the unique constraints are declared with “not null” constraint at the time of creating table.
Syntax:
db2 create table <tab_name>(<col> <col_type> not null unique, ...)
Example:
db2 create table shopper.sales1(id bigint not null unique,
itemname varchar(40) not null, qty int not null,price
double not null)
Inserting the values into table
Example: To insert four different rows with unique ids as 1, 2, 3 and 4.
db2 insert into shopper.sales1(id, itemname, qty, price)
values(1, 'sweet', 100, 89)

db2 insert into shopper.sales1(id, itemname, qty, price)
values(2, 'choco', 50, 60)

db2 insert into shopper.sales1(id, itemname, qty, price)
values(3, 'butter', 30, 40)

db2 insert into shopper.sales1(id, itemname, qty, price)
values(4, 'milk', 1000, 12)
Example: To insert a new row with “id” value 3
db2 insert into shopper.sales1(id, itemname, qty, price)
values(3, 'cheese', 60, 80)
Output: when you try to insert a new row with existed id value it will show this result:
DB21034E  The command was processed as an SQL statement
because it was not a

valid Command Line Processor command.  During
SQL processing it returned:

SQL0803N  One or more values in the INSERT statement,
UPDATE statement, or foreign key update caused by a
DELETE statement are not valid because the primary key,
unique constraint or unique index identified by "1" constrains
table "SHOPPER.SALES1" from having duplicate values for the
index key. SQLSTATE=23505
Primary key
Similar to the unique constraints, you can use a “primary key” and a “foreign key” constraint to declare relationships between multiple tables.
Syntax:
db2 create table <tab_name>(,.., primary key ( ))
Example: To create ‘salesboys’ table with “sid” as a primary key
db2 create table shopper.salesboys(sid int not null, name
varchar(40) not null, salary double not null, constraint
pk_boy_id primary key (sid))
Foreign key
A foreign key is a set of columns in a table which are required to match at least one primary key of a row in another table. It is a referential constraint or referential integrity constraint. It is a logical rule about values in multiple columns in one or more tables. It enables required relationship between the tables.
Earlier, you created a table named “shopper.salesboys” . For this table, the primary key is “sid”. Now you are creating a new table that has sales boy’s personal details with different schema named “employee” and table named “salesboys”. In this case, “sid” is the foreign key.
Syntax:
db2 create table <tab_name>(<col> <col_type>,constraint
<const_name> foreign key (<col_name>)
                  reference <ref_table> (<ref_col>)
Example: [To create a table named ‘salesboys’ with foreign key column ‘sid’]
db2 create table employee.salesboys(
            sid int,
            name varchar(30) not null,
            phone int not null,
            constraint fk_boy_id
            foreign key (sid)
            references shopper.salesboys (sid)
			 on delete restrict
                       )
Example: [Inserting values into primary key table “shopper.salesboys”]
db2 insert into shopper.salesboys values(100,'raju',20000.00),
(101,'kiran',15000.00),
(102,'radha',10000.00),
(103,'wali',20000.00),
(104,'rayan',15000.00)
Example: [Inserting values into foreign key table “employee.salesboys” [without error]]
db2 insert into employee.salesboys values(100,'raju',98998976),
(101,'kiran',98911176),
(102,'radha',943245176),
(103,'wali',89857330),
(104,'rayan',89851130)
If you entered an unknown number, which is not stored in “shopper.salesboys” table, it will show you SQL error.
Example: [error execution]
db2 insert into employee.salesboys values(105,'rayan',89851130)
Output:
DB21034E  The command was processed as an SQL statement because it
was not a valid Command Line Processor command.  During SQL
processing it returned: SQL0530N  The insert or update value of
the FOREIGN KEY "EMPLOYEE.SALESBOYS.FK_BOY_ID" is not equal to any
value of the parent key of the parent table.  SQLSTATE=23503
Checking constraint
You need to use this constraint to add conditional restrictions for a specific column in a table.
Syntax:
db2 create table( primary key ( ), constraint check (condition or condition) )
Example: [To create emp1 table with constraints values]
db2 create table empl
 (id           smallint not null,
  name         varchar(9),
  dept         smallint check (dept between 10 and 100),
  job          char(5)  check (job in ('sales', 'mgr', 'clerk')),
  hiredate     date,
  salary       decimal(7,2),
  comm         decimal(7,2),
  primary key (id),
  constraint yearsal check (year(hiredate) > 1986 or salary > 40500)
 )
Inserting values
You can insert values into a table as shown below:
db2 insert into empl values (1,'lee', 15, 'mgr', '1985-01-01' ,
40000.00, 1000.00)
Dropping the constraint
Let us see the syntaxes for dropping various constraints.
Dropping UNIQUE constraint
Syntax:
db2 alter table <tab_name> drop unique <const_name>
Dropping primary key
Syntax:
db2 alter table <tab_name> drop primary key
Dropping check constraint
Syntax:
db2 alter table <tab_name> drop check <check_const_name>
Dropping foreign key
Syntax:
db2 alter table <tab_name> drop foreigh key <foreign_key_name>
DB2 Indexes
This chapter covers introduction to indexes, their types, creation and dropping.
Introduction
Index is a set of pointers, which can refer to rows in a table, blocks in MDC or ITC tables, XML data in an XML storage object that are logically ordered by the values of one or more keys. It is created on DB2 table columns to speed up the data access for the queries, and to cluster and partition the data efficiently. It can also improve the performance of operation on the view. A table with a unique index can have rows with unique keys. Depending on the table requirements, you can take different types of indexes.
Types of indexes
- Unique and Non-Unique indexes
- Clustered and non-clustered indexes
Creating indexes
For creating unique indexes, you use following syntax:
Syntax:
db2 create unique index <index_name> on
<table_name>(<unique_column>) include (<column_names..>)
Example: To create index for “shopper.sales1” table.
db2 create unique index sales1_indx on
shopper.sales1(id) include (itemname)
Dropping indexes
For dropping the index, you use the following syntax:
Syntax:
db2 create unique index <index_name> on
<table_name>(<unique_column>) include (<column_names..>)
Example:
db2 drop index sales_index
DB2 Triggers
This chapter describes triggers, their types, creation and dropping of the triggers.
Introduction
A trigger is a set of actions, which are performed for responding to an INSERT, UPDATE or DELETE operation on a specified table in the database. Triggers are stored in the database at once. They handle governance of data. They can be accessed and shared among multiple applications. The advantage of using triggers is, if any change needs to be done in the application, it is done at the trigger; instead of changing each application that is accessing the trigger. Triggers are easy to maintain and they enforce faster application development. Triggers are defined using an SQL statement “CREATE TRIGGER”.
Types of triggers
There are two types of triggers:
1. BEFORE triggers
They are executed before any SQL operation.
2. AFTER triggers
They are executed after any SQL operation.
Creating a BEFORE trigger
Let us see how to create a sequence of trigger:
Syntax:
db2 create sequence <seq_name>
Example: Creating a sequence of triggers for table shopper.sales1
db2 create sequence sales1_seq as int start with 1 increment by 1
Syntax:
db2 create trigger <trigger_name> no cascade before insert on
<table_name> referencing new as <table_object> for each row set
<table_object>.<col_name>=nextval for <sequence_name>
Example: Creating trigger for shopper.sales1 table to insert primary key numbers automatically
db2 create trigger sales1_trigger no cascade before insert on
shopper.sales1 referencing new as obj for each row set
obj.id=nextval for sales1_seq
Now try inserting any values:
db2 insert into shopper.sales1(itemname, qty, price)
values('bicks', 100, 24.00)
Retrieving values from table
Let us see how to retrieve values from a table:
Syntax:
db2 select * from <tablename>
Example:
db2 select * from shopper.sales1
Output:
  ID       ITEMNAME       QTY
-------  ------------   ----------
    3      bicks            100
    2      bread            100

  2 record(s) selected.
Creating an AFTER trigger
Let us see how to create an after trigger:
Syntax:
db2 create trigger <trigger_name> no cascade before insert on
<table_name> referencing new as <table_object> for each row set
 <table_object>.<col_name>=nextval for <sequence_name>
Example: [To insert and retrieve the values]
db2 create trigger sales1_tri_after after insert on shopper.sales1
for each row mode db2sql begin atomic update shopper.sales1
set price=qty*price; end
Output:
//inseting values in shopper.sales1
db2 insert into shopper.sales1(itemname,qty,price)
values('chiken',100,124.00)
//output
ID    ITEMNAME       QTY         PRICE
----- -------------- ----------- -----------
    3 bicks          100         2400.00
    4 chiken         100         12400.00
    2 bread          100         2400.00

	3 record(s) selected.
Dropping a trigger
Here is how a database trigger is dropped:
Syntax:
db2 drop trigger <trigger_name>
Example:
db2 drop trigger slaes1_trigger
DB2 - Sequences
This chapter introduces you to the concept of sequence, creation of sequence, viewing the sequence, and dropping them.
Introduction
A sequence is a software function that generates integer numbers in either ascending or descending order, within a definite range, to generate primary key and coordinate other keys among the table. You use sequence for availing integer numbers say, for employee_id or transaction_id. A sequence can support SMALLINT, BIGINT, INTEGER, and DECIMAL data types. A sequence can be shared among multiple applications. A sequence is incremented or decremented irrespective of transactions.
A sequence is created by CREATE SEQUENCE statement.
Types of Sequences
There are two type of sequences available:
NEXTVAL: It returns an incremented value for a sequence number.
PREVIOUS VALUE: It returns recently generated value.
Parameters of sequences
The following parameters are used for sequences:
Data type: This is the data type of the returned incremented value. (SMALLINT, BIGINT, INTEGER, NUMBER, DOUBLE)
START WITH: The reference value, with which the sequence starts.
MINVALUE: A minimum value for a sequence to start with.
MAXVALUE: A maximum value for a sequence.
INCREMENT BY: step value by which a sequence is incremented.
Sequence cycling: the CYCLE clause causes generation of the sequence repeatedly. The sequence generation is conducted by referring the returned value, which is stored into the database by previous sequence generation.
Creating a sequence
You can create sequence using the following syntax:
Syntax:
db2 create sequence <seq_name>
Example: [To create a new sequence with the name ‘sales1_seq’ and increasing values from 1]
db2 create sequence sales1_seq as int start
with 1 increment by 1
Viewing the sequences
You can view a sequence using the syntax given below:
Syntax:
db2 value <previous/next> value for <seq_name>
Example: [To see list of previous updated value in sequence ‘sales1_seq’]
db2 values previous value for sales1_seq
Output:
 1
-----------
  4
  1 record(s) selected.
Dropping the sequence
To remove the sequence, you need to use the “DROP SEQUENCE
Syntax:
db2 drop sequence <seq_name>>
Example: [To drop sequence ‘sales1_seq’ from database]
db2 drop sequence sales1_seq
Output:
DB20000I The SQL command completed successfully.
DB2 Views
This chapter describes introduction of views, creating, modifying and dropping the views.
Introduction
A view is an alternative way of representing the data stored in the tables. It is not an actual table and it does not have any permanent storage. View provides a way of looking at the data in one or more tables. It is a named specification of a result table.
Creating a view
You can create a view using the following syntax:
Syntax:
db2 create view <view_name> (<col_name>,
<col_name1...) as select <cols>..
from <table_name>
Example: Creating view for shopper.sales1 table
db2 create view view_sales1(id, itemname, qty, price)
as select id, itemname, qty, price from
shopper.sales1
Modifying a view
You can modify a view using the following syntax:
Syntax:
db2 alter view <view_name> alter <col_name>
add scope <table_or_view_name>
Example: [To add new table column to existing view ‘view_sales1’]
db2 alter view view_sales1 alter id add
scope shopper.sales1
Dropping the view
You can drop a view using the following syntax:
Syntax:
db2 drop view <view_name>
Example:
db2 drop view sales1_view
DB2 with XML
This chapter describes use of XML with DB2.
Introduction
PureXML feature allows you to store well-formed XML documents in columns of database tables. Those columns have XML database. Data is kept in its native hierarchical form by storing XML data in XML column. The stored XML data can be accessed and managed by DB2 database server functionality. The storage of XML data in its native hierarchical form enables efficient search, retrieval, and update of XML. To update a value in XML data, you need to use XQuery, SQL or combination of both.
Creating a database and table for storing XML data
Create a database by issuing the following syntax:
Syntax:
db2 create database xmldb
By default, databases use UTF-8 (UNICODE) code set. Activate the database and connect to it:
Syntax:
db2 activate db <db_name>
db2 connect to <db_name>
Example:
db2 activate db xmldb
db2 connect to xmldb
Create a well-formed XML file and create a table with data type of the column as ‘XML’. It is mandatory to pass the SQL query containing XML syntax within double quotation marks.
Syntax:
db2 “create table <schema>.<table>(col <datatype>,
col <xml datatype>)”
Example:
db2 "create table shope.books(id bigint not null
primary key, book XML)"
Insert xml values into table, well-formed XML documents are inserted into XML type column using SQL statement ‘INSERT’.
Syntax:
db2 “insert into <table_name> values(value1, value2)”
Example:
db2 "insert into shope.books values(1000, '<catalog>
<book>

<author> Gambardella Matthew</author>
<title>XML Developers Guide</title>
<genre>Computer</genre>
<price>44.95</price>
<publish_date>2000-10-01</publish_date>
<description>An in-depth look at creating application
with XML</description>
</book>

</catalog>')"
Updating XML data in a table
You can update XML data in a table by using the following syntax:
Syntax:
db2 “update <table_name> set <column>=<value> where
<column>=<value>”
Example:
db2 "update shope.books set book='<catalog>

<book>
<author> Gambardella, Matthew</author>
<title>XML Developers Guide</title>
<genre>Computer</genre>
<price>44.95</price>
<publish_date>2000-10-01</publish_date>
<description>An in-depth XML</description>

</book>

</catalog>' where id=1000"
DB2 - Backup and Recovery
This chapter describes backup and restore methods of database.

Introduction
Backup and recovery methods are designed to keep our information safe. In Command Line Interface (CLI) or Graphical User Interface (GUI) using backup and recovery utilities you can take backup or restore the data of databases in DB2 UDB.
Logging
Log files consist of error logs, which are used to recover from application errors. The logs keep the record of changes in the database. There are two types of logging as described below:
Circular logging
It is a method where the old transaction logs are overwritten when there is a need to allocate a new transaction log file, thus erasing the sequences of log files and reusing them. You are permitted to take only full back-up in offline mode. i.e., the database must be offline to take the full backup.
Archive logging
This mode supports for Online Backup and database recovery using log files called roll forward recovery. The mode of backup can be changed from circular to archive by setting logretain or userexit to ON. For archive logging, backup setting database require a directory that is writable for DB2 process.
Backup
Using Backup command you can take copy of entire database. This backup copy includes database system files, data files, log files, control information and so on.
You can take backup while working offline as well as online.
Offline backup
Syntax: [To list the active applications/databases]
db2 list application
Output:
Auth Id  Application    Appl.      Application Id
DB       # of
         Name           Handle
Name    Agents
-------- -------------- ---------- ---------------------
----------------------------------------- -------- -----
DB2INST1 db2bp          39
*LOCAL.db2inst1.140722043938
ONE      1
Syntax: [To force application using app. Handled id]
db2 "force application (39)"
Output:
DB20000I  The FORCE APPLICATION command completed
successfully.

DB21024I  This command is asynchronous and may not
be effective immediately.
Syntax: [To terminate Database Connection]
db2 terminate
Syntax: [To deactivate Database]
db2 deactivate database one
Syntax: [To take the backup file]
db2 backup database <db_name> to <location>
Example:
db2 backup database one to /home/db2inst1/
Output:
Backup successful. The timestamp for this backup image is :
20140722105345
Online backup
To start, you need to change the mode from Circular logging to Archive Logging.
Syntax: [To check if the database is using circular or archive logging]
db2 get db cfg for one | grep LOGARCH
Output:
First log archive method (LOGARCHMETH1) = OFF
 Archive compression for logarchmeth1  (LOGARCHCOMPR1) = OFF
 Options for logarchmeth1              (LOGARCHOPT1) =
 Second log archive method             (LOGARCHMETH2) = OFF
 Archive compression for logarchmeth2  (LOGARCHCOMPR2) = OFF
 Options for logarchmeth2              (LOGARCHOPT2) =
In the above output, the highlighted values are [logarchmeth1 and logarchmeth2] in off mode, which implies that the current database in “CIRCULLAR LOGGING” mode. If you need to work with ‘ARCHIVE LOGGING’ mode, you need to change or add path in the variables logarchmeth1 and logarchmeth2 present in the configuration file.
Updating logarchmeth1 with required archive directory
Syntax: [To make directories]
mkdir backup
mkdir backup/ArchiveDest
Syntax: [To provide user permissions for folder]
chown db2inst1:db2iadm1 backup/ArchiveDest
Syntax: [To update configuration LOGARCHMETH1]
db2 update database configuration for one using LOGARCHMETH1
'DISK:/home/db2inst1/backup/ArchiveDest'
You can take offline backup for safety, activate the database and connect to it.
Syntax: [To take online backup]
db2 backup database one online to
/home/db2inst1/onlinebackup/ compress include logs
Output:
db2 backup database one online to
/home/db2inst1/onlinebackup/ compress include logs
Verify Backup file using following command:
Syntax:
db2ckbkp <location/backup file>
Example:
db2ckbkp
/home/db2inst1/ONE.0.db2inst1.DBPART000.20140722112743.001
Listing the history of backup files
Syntax:
db2 list history backup all for one
Output:
                    List History File for one

Number of matching file entries = 4

Op Obj Timestamp+Sequence Type Dev Earliest Log Current Log
Backup ID
 -- --- ------------------ ---- --- ------------ ------------
 --------------
  B  D  20140722105345001   F    D  S0000000.LOG S0000000.LOG

 ------------------------------------------------------------
 ----------------

 Contains 4 tablespace(s):
 00001 SYSCATSPACE

 00002 USERSPACE1

 00003 SYSTOOLSPACE

 00004 TS1
  ------------------------------------------------------------
  ----------------
  Comment: DB2 BACKUP ONE OFFLINE

 Start Time: 20140722105345

   End Time: 20140722105347

     Status: A
 ------------------------------------------------------------
 ----------------
 EID: 3 Location: /home/db2inst1


 Op Obj Timestamp+Sequence Type Dev Earliest Log Current Log
 Backup ID
 -- --- ------------------ ---- --- ------------ ------------
 --------------
  B  D  20140722112239000   N       S0000000.LOG S0000000.LOG
 ------------------------------------------------------------
 -------------------------------------------------------------
 -------------------------------

 Comment: DB2 BACKUP ONE ONLINE

 Start Time: 20140722112239

   End Time: 20140722112240

     Status: A
 ------------------------------------------------------------
 ----------------
  EID: 4 Location:
SQLCA Information

 sqlcaid : SQLCA     sqlcabc: 136   sqlcode: -2413   sqlerrml: 0

 sqlerrmc:
 sqlerrp : sqlubIni
 sqlerrd : (1) 0                (2) 0                (3) 0

           (4) 0                (5) 0                (6) 0

 sqlwarn : (1)      (2)      (3)      (4)        (5)       (6)

           (7)      (8)      (9)      (10)       (11)
 sqlstate:

 Op Obj Timestamp+Sequence Type Dev Earliest Log Current Log
 Backup ID
  -- --- ------------------ ---- --- ------------ ------------
  --------------
   B  D  20140722112743001   F    D  S0000000.LOG S0000000.LOG

 ------------------------------------------------------------
 ----------------
 Contains 4 tablespace(s):

 00001 SYSCATSPACE

 00002 USERSPACE1

 00003 SYSTOOLSPACE

 00004 TS1
  -------------------------------------------------------------
  ----------------
  Comment: DB2 BACKUP ONE OFFLINE

 Start Time: 20140722112743

   End Time: 20140722112743

     Status: A
 -------------------------------------------------------------
  ----------------
 EID: 5 Location: /home/db2inst1

 Op Obj Timestamp+Sequence Type Dev Earliest Log Current Log
 Backup ID
  -------------------------------------------------------------
  ----------------

R  D  20140722114519001   F
20140722112743

 ------------------------------------------------------------
 ----------------
 Contains 4 tablespace(s):

 00001 SYSCATSPACE

  00002 USERSPACE1

 00003 SYSTOOLSPACE

 00004 TS1
 ------------------------------------------------------------
 ----------------
Comment: RESTORE ONE WITH RF

 Start Time: 20140722114519

   End Time: 20140722115015
     Status: A

 ------------------------------------------------------------
 ----------------
  EID: 6 Location:
Restoring the database from backup
To restore the database from backup file, you need to follow the given syntax:
Syntax:
db2 restore database <db_name> from <location>
taken at <timestamp>
Example:
db2 restore database one from /home/db2inst1/ taken at
20140722112743
Output:
SQL2523W  Warning!  Restoring to an existing database that is
different from

the database on the backup image, but have matching names.
The target database

will be overwritten by the backup version.  The Roll-forward
recovery logs

associated with the target database will be deleted.

Do you want to continue ? (y/n) y

DB20000I  The RESTORE DATABASE command completed successfully.
Roll forward all the logs located in the log directory, including latest changes just before the disk drive failure.
Syntax:
db2 rollforward db <db_name> to end of logs and stop
Example:
db2 rollforward db one to end of logs and stop
Output:
                                 Rollforward Status
 Input database alias                   = one
 Number of members have returned status = 1
 Member ID                              = 0
 Rollforward status                     = not pending
 Next log file to be read               =
 Log files processed                    = S0000000.LOG -
 S0000001.LOG
 Last committed transaction            = 2014-07-22-
 06.00.33.000000 UTC
DB20000I  The ROLLFORWARD command completed successfully.
DB2 - Database Security
This chapter describes database security.
Introduction
DB2 database and functions can be managed by two different modes of security controls:
- Authentication
- Authorization
Authentication
Authentication is the process of confirming that a user logs in only in accordance with the rights to perform the activities he is authorized to perform. User authentication can be performed at operating system level or database level itself. By using authentication tools for biometrics such as retina and figure prints are in use to keep the database from hackers or malicious users.
The database security can be managed from outside the db2 database system. Here are some type of security authentication process:
- Based on Operating System authentications.
- Lightweight Directory Access Protocol (LDAP)
For DB2, the security service is a part of operating system as a separate product. For Authentication, it requires two different credentials, those are userid or username, and password.
Authorization
You can access the DB2 Database and its functionality within the DB2 database system, which is managed by the DB2 Database manager. Authorization is a process managed by the DB2 Database manager. The manager obtains information about the current authenticated user, that indicates which database operation the user can perform or access.
Here are different ways of permissions available for authorization:
Primary permission: Grants the authorization ID directly.
Secondary permission: Grants to the groups and roles if the user is a member
Public permission: Grants to all users publicly.
Context-sensitive permission: Grants to the trusted context role.
Authorization can be given to users based on the categories below:
- System-level authorization
- System administrator [SYSADM]
- System Control [SYSCTRL]
- System maintenance [SYSMAINT]
- System monitor [SYSMON]
Authorities provide of control over instance-level functionality. Authority provide to group privileges, to control maintenance and authority operations. For instance, database and database objects.
- Database-level authorization
- Security Administrator [SECADM]
- Database Administrator [DBADM]
- Access Control [ACCESSCTRL]
- Data access [DATAACCESS]
- SQL administrator. [SQLADM]
- Workload management administrator [WLMADM]
- Explain [EXPLAIN]
Authorities provide controls within the database. Other authorities for database include with LDAD and CONNECT.
- Object-Level Authorization: Object-Level authorization involves verifying privileges when an operation is performed on an object.
- Content-based Authorization: User can have read and write access to individual rows and columns on a particular table using Label-based access Control [LBAC].
DB2 tables and configuration files are used to record the permissions associated with authorization names. When a user tries to access the data, the recorded permissions verify the following permissions:
- Authorization name of the user
- Which group belongs to the user
- Which roles are granted directly to the user or indirectly to a group
- Permissions acquired through a trusted context.
While working with the SQL statements, the DB2 authorization model considers the combination of the following permissions:
- Permissions granted to the primary authorization ID associated with the SQL statements.
- Secondary authorization IDs associated with the SQL statements.
- Granted to PUBLIC
- Granted to the trusted context role.
Instance level authorities
Let us discuss some instance related authorities.
System administration authority (SYSADM)
It is highest level administrative authority at the instance-level. Users with SYSADM authority can execute some databases and database manager commands within the instance. Users with SYSADM authority can perform the following operations:
- Upgrade a Database
- Restore a Database
- Update Database manager configuration file.
System control authority (SYSCTRL)
It is the highest level in System control authority. It provides to perform maintenance and utility operations against the database manager instance and its databases. These operations can affect system resources, but they do not allow direct access to data in the database.
Users with SYSCTRL authority can perform the following actions:
- Updating the database, Node, or Distributed Connect Service (DCS) directory
- Forcing users off the system-level
- Creating or Dropping a database-level
- Creating, altering, or dropping a table space
- Using any table space
- Restoring Database
System maintenance authority (SYSMAINT)
It is a second level of system control authority. It provides to perform maintenance and utility operations against the database manager instance and its databases. These operations affect the system resources without allowing direct access to data in the database. This authority is designed for users to maintain databases within a database manager instance that contains sensitive data.
Only Users with SYSMAINT or higher level system authorities can perform the following tasks:
- Taking backup
- Restoring the backup
- Roll forward recovery
- Starting or stopping instance
- Restoring tablespaces
- Executing db2trc command
- Taking system monitor snapshots in case of an Instance level user or a database level user.
A user with SYSMAINT can perform the following tasks:
- Query the state of a tablespace
- Updating log history files
- Reorganizing of tables
- Using RUNSTATS (Collection catalog statistics)
System monitor authority (SYSMON)
With this authority, the user can monitor or take snapshots of database manager instance or its database. SYSMON authority enables the user to run the following tasks:
- GET DATABASE MANAGER MONITOR SWITCHES
- GET MONITOR SWITCHES
- GET SNAPSHOT
- LIST
- LIST ACTIVE DATABASES
- LIST APPLICATIONS
- LIST DATABASE PARTITION GROUPS
- LIST DCS APPLICATIONS
- LIST PACKAGES
- LIST TABLES
- LIST TABLESPACE CONTAINERS
- LIST TABLESPACES
- LIST UTITLITIES
- RESET MONITOR
- UPDATE MONITOR SWITCHES
Database authorities
Each database authority holds the authorization ID to perform some action on the database. These database authorities are different from privileges. Here is the list of some database authorities:
ACCESSCTRL: allows to grant and revoke all object privileges and database authorities.
BINDADD: Allows to create a new package in the database.
CONNECT: Allows to connect to the database.
CREATETAB: Allows to create new tables in the database.
CREATE_EXTERNAL_ROUTINE: Allows to create a procedure to be used by applications and the users of the databases.
DATAACCESS: Allows to access data stored in the database tables.
DBADM: Act as a database administrator. It gives all other database authorities except ACCESSCTRL, DATAACCESS, and SECADM.
EXPLAIN: Allows to explain query plans without requiring them to hold the privileges to access the data in the tables.
IMPLICIT_SCHEMA: Allows a user to create a schema implicitly by creating an object using a CREATE statement.
LOAD: Allows to load data into table.
QUIESCE_CONNECT: Allows to access the database while it is quiesce (temporarily disabled).
SECADM: Allows to act as a security administrator for the database.
SQLADM: Allows to monitor and tune SQL statements.
WLMADM: Allows to act as a workload administrator
Privileges
SETSESSIONUSER
Authorization ID privileges involve actions on authorization IDs. There is only one privilege, called the SETSESSIONUSER privilege. It can be granted to user or a group and it allows to session user to switch identities to any of the authorization IDs on which the privileges are granted. This privilege is granted by user SECADM authority.
Schema privileges
This privileges involve actions on schema in the database. The owner of the schema has all the permissions to manipulate the schema objects like tables, views, indexes, packages, data types, functions, triggers, procedures and aliases. A user, a group, a role, or PUBLIC can be granted any user of the following privileges:
- CREATEIN: allows to create objects within the schema
- ALTERIN: allows to modify objects within the schema.
DROPIN
This allows to delete the objects within the schema.
Tablespace privileges
These privileges involve actions on the tablespaces in the database. User can be granted the USE privilege for the tablespaces. The privileges then allow them to create tables within tablespaces. The privilege owner can grant the USE privilege with the command WITH GRANT OPTION on the tablespace when tablespace is created. And SECADM or ACCESSCTRL authorities have the permissions to USE privileges on the tablespace.
Table and view privileges
The user must have CONNECT authority on the database to be able to use table and view privileges. The privileges for tables and views are as given below:
CONTROL
It provides all the privileges for a table or a view including drop and grant, revoke individual table privileges to the user.
ALTER
It allows user to modify a table.
DELETE
It allows the user to delete rows from the table or view.
INDEX
It allows the user to insert a row into table or view. It can also run import utility.
REFERENCES
It allows the users to create and drop a foreign key.
SELECT
It allows the user to retrieve rows from a table or view.
UPDATE
It allows the user to change entries in a table, view.
Package privileges
User must have CONNECT authority to the database. Package is a database object that contains the information of database manager to access data in the most efficient way for a particular application.
CONTROL
It provides the user with privileges of rebinding, dropping or executing packages. A user with this privileges is granted to BIND and EXECUTE privileges.
BIND
It allows the user to bind or rebind that package.
EXECUTE
Allows to execute a package.
Index privileges
This privilege automatically receives CONTROL privilege on the index.
Sequence privileges
Sequence automatically receives the USAGE and ALTER privileges on the sequence.
Routine privileges
It involves the action of routines such as functions, procedures, and methods within a database.
DB2 - Roles
Introduction
A role is a database object that groups multiple privileges that can be assigned to users, groups, PUBLIC or other roles by using GRANT statement.
Restrictions on roles
- A role cannot own database objects.
- Permissions and roles granted to groups are not considered when you create the following database objects.
- Package Containing static SQL
- Views
- Materialized Query Tables (MQT)
- Triggers
- SQL Routines
Creating and granting membership in roles
Syntax: [To create a new role]
db2 create role <role_name>
Example: [To create a new role named ‘sales’ to add some table to be managed by some user or group]
db2 create role sales
Output:
DB20000I The SQL command completed successfully.
Granting role from DBADM to a particular table
Syntax: [To grant permission of a role to a table]
db2 grant select on table <table_name> to role <role_name>
Example: [To add permission to manage a table ‘shope.books’ to role ‘sales’]
db2 grant select on table shope.books to role sales
Output:
DB20000I The SQL command completed successfully.
Security administrator grants role to the required users. (Before you use this command, you need to create the users.)
Syntax: [To add users to a role]
db2 grant role <role_name> to user <username>
Example: [To add a user ‘mastanvali’ to a role ‘sales’]
db2 grant sales to user mastanvali
Output:
DB20000I The SQL command completed successfully.
Role hierarchies
For creating a hierarchies for roles, each role is granted permissions/ membership with another role.
Syntax: [before this syntax create a new role with name of “production”]
db2 grant role <roll_name> to role <role_name>
Example: [To provide permission of a role ‘sales’ to another role ‘production’]
db2 grant sales to role production
DB2 - LDAP
Introduction
LDAP is Lightweight Directory Access Protocol. LDAP is a global directory service, industry-standard protocol, which is based on client-server model and runs on a layer above the TCP/IP stack. The LDAP provides a facility to connect to, access, modify, and search the internet directory.
The LDAP servers contain information which is organized in the form of a directory tree. The clients ask server to provide information or to perform some operation on a particular information. The server answers the client by providing required information if it has one, or it refers the client to another server for action on required information. The client then acquires the desired information from another server.
The tree structure of directory is maintained same across all the participating servers. This is a prominent feature of LDAP directory service. Hence, irrespective of which server is referred to by the client, the client always gets required information in an error-free manner. Here, we use LDAP to authenticate IBM DB2 as a replacement of operating system authentication.
There are two types of LDAP:
- Transparent
- Plug-in
Let us see how to configure a transparent LDAP.
Configuring transparent LDAP
To start with configuration of transparent LDAP, you need to configure the LDAP server.
LDAP server configuration
Create a SLAPD.conf file, which contains all the information about users and group object in the LDAP. When you install LDAP server, by default it is configured with basic LDAP directory tree on your machine.
The table shown below indicates the file configuration after modification.
The text highlighted with yellow the code box means for the following:
DBA user-id = “db2my1”, group = “db1my1adm”, password= “db2my1” Admin user-id = “my1adm”, group = “dbmy1ctl”.
# base dn: example.com dn: dc=example,dc=com dc: example o: example objectClass: organization objectClass: dcObject # pc box db dn: dc=db697,dc=example,dc=com dc: db697 o: db697 objectClass: organization objectClass: dcObject # # Group: dbadm # dn: cn=dbmy1adm,dc=db697,dc=example,dc=com cn: dbmy1adm objectClass: top objectClass: posixGroup gidNumber: 400 objectClass: groupOfNames member: uid=db2my1,cn=dbmy1adm,dc=db697,dc=example,dc=com memberUid: db2my1 # # User: db2 # dn: uid=db2my1,cn=dbmy1adm,dc=db697,dc=example,dc=com cn: db2my1 sn: db2my1 uid: db2my1 objectClass: top objectClass: inetOrgPerson objectClass: posixAccount uidNumber: 400 gidNumber: 400 loginShell: /bin/csh homeDirectory: /db2/db2my1 # # Group: db ctl # dn: cn=dbmy1ctl,dc=db697,dc=example,dc=com cn: dbmy1ctl objectClass: top objectClass: posixGroup gidNumber: 404 objectClass: groupOfNames member: uid=my1adm,cn=dbmy1adm,dc=db697,dc=example,dc=com memberUid: my1adm # # User: adm # dn: uid=my1adm,cn=dbmy1ctl,dc=db697,dc=example,dc=com cn: my1adm sn: my1adm uid: my1adm objectClass: top objectClass: inetOrgPerson objectClass: posixAccount uidNumber: 404 gidNumber: 404 loginShell: /bin/csh homeDirectory: /home/my1adm
Save the above file with name ‘/var/lib/slapd.conf’, then execute this file by following command to add these values into LDAP Server. This is a linux command; not a db2 command.
ldapadd r- -D ‘cn=Manager,dc=example,dc=com” –W –f
/var/lib/slapd.conf
After registering the DB2 users and the DB2 group at the LDAP Server, logon to the particular user where you have installed instance and database. You need to configure LDAP client to confirm to client where your server is located, be it remote or local.
LDAP client configuration
The LDAP Client configuration is saved in the file ‘ldap.conf’. There are two files available for configuration parameters, one is common and the other is specific. You should find the first one at ‘/etc/ldap.conf’ and the latter is located at ‘/etc/openldap/ldap.conf’.
The following data is available in common LDAP client configuration file
# File: /etc/ldap.conf
# The file contains lots of more entries and many of them
# are comments. You show only the interesting values for now
host localhost
base dc=example,dc=com
ldap_version 3
pam_password crypt
pam_filter objectclass=posixAccount
nss_map_attribute uniqueMember member
nss_base_passwd dc=example,dc=com
nss_base_shadow dc=example,dc=com
nss_base_group dc=example,dc=com
You need to change the location of server and domain information according to the DB2 configuration. If we are using server in same system then mention it as ‘localhost’ at ‘host’ and at ‘base’ you can configure which is mentioned in ‘SLAPD.conf’ file for LDAP server.
Pluggable Authentication Model (PAM) is an API for authentication services. This is common interface for LDAP authentication with an encrypted password and special LDAP object of type posixAccount. All LDAP objects of this type represent an abstraction of an account with portable Operating System Interface (POSIX) attributes.
Network Security Services (NSS) is a set of libraries to support cross-platform development of security-enabled client and server applications. This includes libraries like SSL, TLS, PKCS S/MIME and other security standards.
You need to specify the base DN for this interface and two additional mapping attributes. OpenLDAP client configuration file contains the entries given below:
host localhost
base dc=example,dc=com
Till this you just define the host of LDAP serve and the base DN.
Validating OpenLDAP environment
After you configured your LDAP Server and LDAP Client, verify both for communication.
Step1: Check your Local LDAP server is running. Using below command:
ps -ef | grep -i ldap
This command should list the LDAP deamon which represents your LDAP server:
/usr/lib/openldap/slapd -h ldap:/// -u ldap -g ldap -o slp=on
This indicates that you LDAP server is running and is waiting for request from clients. If there is no such process for previous commands you can start LDAP server with the ’rcldap’ command.
rcldap start
When the server starts, you can monitor this in the file ‘/var/log/messages/ by issuing the following command.
tail –f /var/log/messages
Testing connection to LDAP server with ldapsearch
The ldapsearch command opens a connection to an LDAP server, binds to it and performs a search query which can be specified by using special parameters ‘-x’ connect to your LDAP server with a simple authentication mechanism by using the –x parameter instead of a more complex mechanism like Simple Authentication and Security Layer (SASL)
ldapsearch –x
LDAP server should reply with a response given below, containing all of your LDAP entries in a LDAP Data Interchange Format(LDIF).
# extended LDIF
#
# LDAPv3
# base <> with scope subtree
# filter: (objectclass=*)
# requesting: ALL
# example.com
dn: dc=example,
dc=com  dc: example
o: example
objectClass: organization
objectClass: dcObject
# search result
search: 2
result: 0 Success
# numResponses: 2
# numEntries: 1
Configuring DB2
After working with LDAP server and client, you need to configure our DB2 database for use with LDAP. Let us discuss, how you can install and configure your database to use our LDAP environment for the DB2 user authentication process.
Configuring DB2 and LDAP interaction plug-ins
IBM provides a free package with LDAP plug-ins for DB2. The DB2 package includes three DB2 security plug-ins for each of the following:
- server side authentication
- client side authentication
- group lookup
Depending upon your requirements, you can use any of the three plug-ins or all of them. This plugin do not support environments where some users are defined in LDAP and others in the operating Systems. If you decide to use the LDAP plug-ins, you need to define all users associated with the database in the LDAP server. The same principle applies to the group plug-in.
You have to decide which plug-ins are mandatory for our system. The client authentication plug-ins used in scenarios where the user ID and the password validation supplied on a CONNECT or ATTACH statement occurs on the client system. So the database manager configuration parameters SRVCON_AUTH or AUTHENTICATION need to be set to the value CLIENT. The client authentication is difficult to secure and is not generally recommended. Server plug-in is generally recommended because it performs a server side validation of user IDs and passwords, if the client executes a CONNECT or ATTACH statement and this is secure way. The server plug-in also provides a way to map LDAP user IDs DB2 authorization IDs.
Now you can start installation and configuration of the DB2 security plug-ins, you need to think about the required directory information tree for DB2. DB2 uses indirect authorization which means that a user belongs to a group and this group was granted with fewer authorities. You need to define all DB2 users and DB2 groups in LDAP directory.
Image
The LDIF file openldap.ldif should contain the code below:
#
# LDAP root object
# example.com
#
dn: dc=example,
dc=com
dc: example
o: example
objectClass: organization
objectClass: dcObject
 #
 # db2 groups
 #
 dn: cn=dasadm1,dc=example,dc=com
 cn: dasadm1
 objectClass: top
 objectClass: posixGroup
 gidNumber: 300
 objectClass: groupOfNames
 member: uid=dasusr1,cn=dasadm1,dc=example,dc=com
 memberUid: dasusr1
 dn: cn=db2grp1,dc=example,dc=com
 cn: db2grp1
 objectClass: top
 objectClass: posixGroup
 gidNumber: 301
 objectClass: groupOfNames
 member: uid=db2inst2,cn=db2grp1,dc=example,dc=com  memberUid: db2inst2
 dn: cn=db2fgrp1,dc=example,dc=com
 cn: db2fgrp1
 objectClass: top
 objectClass: posixGroup
 gidNumber: 302
 objectClass: groupOfNames
 member: uid=db2fenc1,cn=db2fgrp1,dc=example,dc=com
 memberUid: db2fenc1
 #
 # db2 users
 #
 dn: uid=dasusr1,
 cn=dasadm1,
 dc=example,dc=com
 cn: dasusr1
 sn: dasusr1
 uid: dasusr1
 objectClass: top
 objectClass: inetOrgPerson
 objectClass: posixAccount
 uidNumber: 300
 gidNumber: 300
 loginShell: /bin/bash
 homeDirectory: /home/dasusr1
 dn: uid=db2inst2,cn=db2grp1,dc=example,dc=com
 cn: db2inst2
 sn: db2inst2
 uid: db2inst2
 objectClass: top
 objectClass: inetOrgPerson
 objectClass: posixAccount
 uidNumber: 301
 gidNumber: 301
 loginShell: /bin/bash
 homeDirectory: /home/db2inst2
 dn: uid=db2fenc1,cn=db2fgrp1,dc=example,dc=com
 cn: db2fenc1
 sn: db2fenc1
 uid: db2fenc1
 objectClass: top
 objectClass: inetOrgPerson
 objectClass: posixAccount
 uidNumber: 303
 gidNumber: 303
 loginShell: /bin/bash
 homeDirectory: /home/db2fenc1
Create a file named ‘db2.ldif’ and paste the above example into it. Using this file, add the defined structures to your LDAP directory.
To add the DB2 users and DB2 groups to the LDAP directory, you need to bind the user as ‘rootdn’ to the LDAP server in order to get the exact privileges.
Execute the following syntaxes to fill the LDAP information directory with all our objects defined in the LDIF file ‘db2.ldif’
ldapadd –x –D “cn=Manager, dc=example,dc=com” –W –f <path>/db2.ldif
Perform the search result with more parameter
ldapsearch –x |more
Preparing file system for DB2 usage
Creating instance for our LDAP user db2inst2. This user requires home directory with two empty files inside the home directory. Before you create a new instance, you need to create a user who will be the owner of the instance.
After creating the instance user, you should have to create the file ‘.profile’ and ‘.login’ in user home directory, which will be modified by DB2. To create this file in the directory, execute the following command:
mkdir /home/db2inst2
mkdir /home/db2inst2/.login
mkdir /home/db2inst2/.profile
You have registered all users and groups related with DB2 in LDAP directory, now you can create an instance with the name ‘db2inst2’ with the instance owner id ‘db2inst2’ and use the fenced user id ‘db2fenc1’, which is needed for running user defined functions (UDFs)or stored procedures.
/opt/ibm/db2/V10.1/instance/db2icrt –u db2fenc1 db2inst2
DBI1070I Program db2icrt completed successfully.
Now check the instance home directory. You can see new sub-directory called ‘sqllib’ and the .profile and .login files customized for DB2 usage.
Configuring authentication public-ins for LDAP support in DB2
Copy the required LDAP plug-ins to the appropriate DB2 directory:
cp // /v10/IBMLDAPauthserver.so /home/db2inst2/sqllib/security /plugin/server/. cp / / /v10/IBMLDAPgroups.so /home/db2inst2/sqllib/security /plugin/group/.
Once the plug-ins are copied to the specified directory, you toned to login to DB2 instance owner and change the database manager configuration to use these plug-ins.
Su – db2inst2
db2inst2> db2 update dbm cfg using svrcon_pw_plugin
IBMLDAPauthserver
db2inst2> db2 update dbm cfg using group_plugin
IBMLDAPgroups
db2inst2> db2 update dbm cfg using authentication
SERVER_ENCRYPT
db2inst2> db2stop
db2inst2> db2start
This modification comes into effect after you start DB2 instance. After restarting the instance, you need to install and configure the main DB2 LDAP configuration file named “IBMLDAPSecurity.ini” to make DB2 plug-ins work with the current LDAP configuration.
IBMLDAPSecurity.ini file contains
;-----------------------------------------------------------
; SERVER RELATED VALUES
;-----------------------------------------------------------
; Name of your LDAP server(s).
; This is a space separated list of LDAP server addresses,
; with an optional port number for each one:
; host1[:port] [host2:[port2] ... ]
; The default port number is 389, or 636 if SSL is enabled.
LDAP_HOST = my.ldap.server
;-----------------------------------------------------------
; USER RELATED VALUES
;-----------------------------------------------------------
rs
; LDAP object class used for use USER_OBJECTCLASS = posixAccount
; LDAP user attribute that represents the "userid"
; This attribute is combined with the USER_OBJECTCLASS and
; USER_BASEDN (if specified) to construct an LDAP search
; filter when a user issues a DB2 CONNECT statement with an
; unqualified userid. For example, using the default values
; in this configuration file, (db2 connect to MYDB user bob
; using bobpass) results in the following search filter:
OrgPerson)(uid=bob)
; &(objectClass=inet USERID_ATTRIBUTE = uid
representing the DB2 authorization ID
; LDAP user attribute, AUTHID_ATTRIBUTE = uid
;-----------------------------------------------------------
; GROUP RELATED VALUES
;-----------------------------------------------------------
ps
; LDAP object class used for grou GROUP_OBJECTCLASS = groupOfNames
at represents the name of the group
; LDAP group attribute th GROUPNAME_ATTRIBUTE = cn
; Determines the method used to find the group memberships
; for a user. Possible values are:
; SEARCH_BY_DN - Search for groups that list the user as
; a member. Membership is indicated by the
; group attribute defined as
; GROUP_LOOKUP_ATTRIBUTE.
; USER_ATTRIBUTE - A user's groups are listed as attributes
; of the user object itself. Search for the
; user attribute defined as
TRIBUTE to get the groups.
; GROUP_LOOKUP_AT GROUP_LOOKUP_METHOD = SEARCH_BY_DN
; GROUP_LOOKUP_ATTRIBUTE
; Name of the attribute used to determine group membership,
; as described above.
llGroups
; GROUP_LOOKUP_ATTRIBUTE = ibm-a GROUP_LOOKUP_ATTRIBUTE = member
Now locate the file IBMLDAPSecurity.ini file in the current instance directory. Copy the above sample contents into the same.
Cp
//db2_ldap_pkg/IBMLDAPSecurity.ini
/home/db2inst2/sqllib/cfg/
Now you need to restart your DB2 instance, using two syntaxes given below:
db2inst2> db2stop

Db2inst2> db2start
At this point, if you try ‘db2start’ command, you will get security error message. Because, DB2 security configuration is not yet correctly configured for your LDAP environment.
Customizing both configurations
Keep LDAP_HOST name handy, which is configured in slapd.conf file.
Now edit IMBLDAPSecurity.ini file and type the LDAP_HOST name. The LDAP_HOST name in both the said files must be identical.
The contents of file are as shown below:
      ;-----------------------------------------------------------
      ; SERVER RELATED VALUES
      ;-----------------------------------------------------------
      LDAP_HOST = localhost
      ;-----------------------------------------------------------
      ; USER RELATED VALUES
      ----------------------------
      ;-------------------------------
      USER_OBJECTCLASS = posixAccount
      USER_BASEDN = dc=example,dc=com
      USERID_ATTRIBUTE = uid
      AUTHID_ATTRIBUTE = uid
      ;-----------------------------------------------------------
      ; GROUP RELATED VALUES
      ;-----------------------------------------------------------
      GROUP_OBJECTCLASS = groupOfNames
	  GROUP_BASEDN = dc=example,dc=com
      GROUPNAME_ATTRIBUTE = cn
      GROUP_LOOKUP_METHOD = SEARCH_BY_DN
      GROUP_LOOKUP_ATTRIBUTE = member
After changing these values, LDAP immediately takes effect and your DB2 environment with LDAP works perfectly.
You can logout and login again to ‘db2inst2’ user.
Now your instance is working with LDAP directory.
