- iOS Tutorial
- iOS - Home
- iOS - Getting Started
- iOS - Environment Setup
- iOS - Objective-C Basics
- iOS - First iPhone Application
- iOS - Actions and Outlets
- iOS - Delegates
- iOS - UI Elements
- iOS - Accelerometer
- iOS - Universal Applications
- iOS - Camera Management
- iOS - Location Handling
- iOS - SQLite Database
- iOS - Sending Email
- iOS - Audio & Video
- iOS - File Handling
- iOS - Accessing Maps
- iOS - In-App Purchase
- iOS - iAd Integration
- iOS - GameKit
- iOS - Storyboards
- iOS - Auto Layouts
- iOS - Twitter & Facebook
- iOS - Memory Management
- iOS - Application Debugging
- iOS Useful Resources
- iOS - Quick Guide
- iOS - Useful Resources
- iOS - Discussion
- Selected Reading
- UPSC IAS Exams Notes
- Developer's Best Practices
- Questions and Answers
- Effective Resume Writing
- HR Interview Questions
- Computer Glossary
- Who is Who
iOS - Auto Layouts
Auto-layouts were introduced in iOS 6.0. When we use auto-layouts, our deployment target should be 6.0 and higher. Auto-layouts help us create interfaces that can be used for multiple orientations and multiple devices.
Goal of Our Example
We will add two buttons that will be placed in a certain distance from the center of the screen. We will also try to add a resizable text field that will be placed from a certain distance from above the buttons.
Our Approach
We will add a text field and two buttons in the code along with their constraints. The constraints of each UI Elements will be created and added to the super view. We will have to disable auto-resizing for each of the UI elements we add in order to get the desired result.
Steps Involved
Step 1 − Create a simple view-based application.
Step 2 − We will edit only ViewController.m and it is as follows −
#import "ViewController.h"

@interface ViewController ()
@property (nonatomic, strong) UIButton *leftButton;
@property (nonatomic, strong) UIButton *rightButton;
@property (nonatomic, strong) UITextField *textfield;

@end
@implementation ViewController

- (void)viewDidLoad {
   [super viewDidLoad];
   UIView *superview = self.view;

   /*1. Create leftButton and add to our view*/
   self.leftButton = [UIButton buttonWithType:UIButtonTypeRoundedRect];
   self.leftButton.translatesAutoresizingMaskIntoConstraints = NO;
   [self.leftButton setTitle:@"LeftButton" forState:UIControlStateNormal];
   [self.view addSubview:self.leftButton];

   /* 2. Constraint to position LeftButton's X*/
   NSLayoutConstraint *leftButtonXConstraint = [NSLayoutConstraint
   constraintWithItem:self.leftButton attribute:NSLayoutAttributeCenterX
   relatedBy:NSLayoutRelationGreaterThanOrEqual toItem:superview attribute:
   NSLayoutAttributeCenterX multiplier:1.0 constant:-60.0f];

   /* 3. Constraint to position LeftButton's Y*/
   NSLayoutConstraint *leftButtonYConstraint = [NSLayoutConstraint
   constraintWithItem:self.leftButton attribute:NSLayoutAttributeCenterY
   relatedBy:NSLayoutRelationEqual toItem:superview attribute:
   NSLayoutAttributeCenterY multiplier:1.0f constant:0.0f];

   /* 4. Add the constraints to button's superview*/
   [superview addConstraints:@[ leftButtonXConstraint,
   leftButtonYConstraint]];

   /*5. Create rightButton and add to our view*/
   self.rightButton = [UIButton buttonWithType:UIButtonTypeRoundedRect];
   self.rightButton.translatesAutoresizingMaskIntoConstraints = NO;
   [self.rightButton setTitle:@"RightButton" forState:UIControlStateNormal];
   [self.view addSubview:self.rightButton];

   /*6. Constraint to position RightButton's X*/
   NSLayoutConstraint *rightButtonXConstraint = [NSLayoutConstraint
   constraintWithItem:self.rightButton attribute:NSLayoutAttributeCenterX
   relatedBy:NSLayoutRelationGreaterThanOrEqual toItem:superview attribute:
   NSLayoutAttributeCenterX multiplier:1.0 constant:60.0f];

   /*7. Constraint to position RightButton's Y*/
   rightButtonXConstraint.priority = UILayoutPriorityDefaultHigh;
   NSLayoutConstraint *centerYMyConstraint = [NSLayoutConstraint
   constraintWithItem:self.rightButton attribute:NSLayoutAttributeCenterY
   relatedBy:NSLayoutRelationGreaterThanOrEqual toItem:superview attribute:
   NSLayoutAttributeCenterY multiplier:1.0f constant:0.0f];
   [superview addConstraints:@[centerYMyConstraint,
   rightButtonXConstraint]];

   //8. Add Text field
   self.textfield = [[UITextField alloc]initWithFrame:
   CGRectMake(0, 100, 100, 30)];
   self.textfield.borderStyle = UITextBorderStyleRoundedRect;
   self.textfield.translatesAutoresizingMaskIntoConstraints = NO;
   [self.view addSubview:self.textfield];

   //9. Text field Constraints
   NSLayoutConstraint *textFieldTopConstraint = [NSLayoutConstraint
   constraintWithItem:self.textfield attribute:NSLayoutAttributeTop
   relatedBy:NSLayoutRelationGreaterThanOrEqual toItem:superview
   attribute:NSLayoutAttributeTop multiplier:1.0 constant:60.0f];
   NSLayoutConstraint *textFieldBottomConstraint = [NSLayoutConstraint
   constraintWithItem:self.textfield attribute:NSLayoutAttributeTop
   relatedBy:NSLayoutRelationGreaterThanOrEqual toItem:self.rightButton
   attribute:NSLayoutAttributeTop multiplier:0.8 constant:-60.0f];
   NSLayoutConstraint *textFieldLeftConstraint = [NSLayoutConstraint
   constraintWithItem:self.textfield attribute:NSLayoutAttributeLeft
   relatedBy:NSLayoutRelationEqual toItem:superview attribute:
   NSLayoutAttributeLeft multiplier:1.0 constant:30.0f];
   NSLayoutConstraint *textFieldRightConstraint = [NSLayoutConstraint
   constraintWithItem:self.textfield attribute:NSLayoutAttributeRight
   relatedBy:NSLayoutRelationEqual toItem:superview attribute:
   NSLayoutAttributeRight multiplier:1.0 constant:-30.0f];
   [superview addConstraints:@[textFieldBottomConstraint ,
   textFieldLeftConstraint, textFieldRightConstraint,
   textFieldTopConstraint]];
}

- (void)didReceiveMemoryWarning {
   [super didReceiveMemoryWarning];
   // Dispose of any resources that can be recreated.
}
@end
Points to Note
In steps marked 1, 5, and 8, we just programmatically added two buttons and a text field respectively.
In the rest of the steps, we created constraints and added those constraints to the respective super views, which are actually self-views. The constraints of one of the left buttons is as shown below −
NSLayoutConstraint *leftButtonXConstraint = [NSLayoutConstraint
constraintWithItem:self.leftButton attribute:NSLayoutAttributeCenterX
relatedBy:NSLayoutRelationGreaterThanOrEqual toItem:superview attribute:
NSLayoutAttributeCenterX multiplier:1.0 constant:-60.0f];
We have constraintWithItem and toItem which decide between which UI elements we are creating the constraint. The attribute decides on what basis the two elements are linked together. "relatedBy" decides how much effect the attributes have between the elements. Multiplier is the multiplication factor and constant will be added to the multipler.
In the above example, the X of leftButton is always greater than or equal to -60 pixels with respect to the center of the super view. Similarly, other constraints are defined.
Output
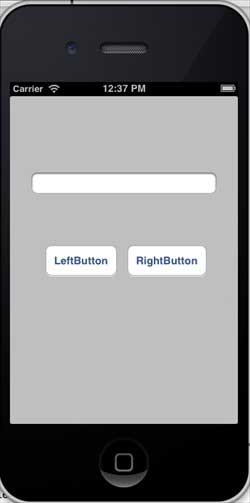
When we run the application, we'll get the following output on the iPhone simulator −

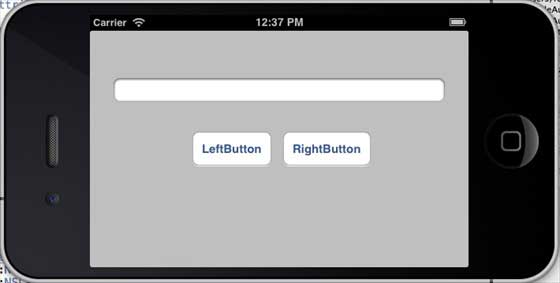
When we change the orientation of the simulator to landscape, we will get the following output −

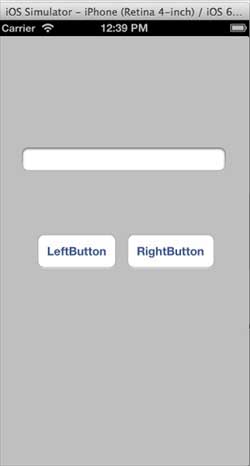
When we run the same application on iPhone 5 simulator, we will get the following output −

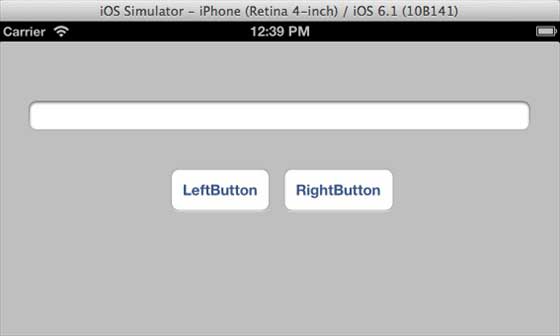
When we change the orientation of the simulator to landscape, we will get the following output −
