- MS Word Basics
- Word - Home
- Word - Getting Started
- Word - Explore Window
- Word - Backstage View
- Word - Entering Text
- Word - Move Around
- Word - Save Document
- Word - Opening a Document
- Word - Closing Document
- Word - Context Help
- Editing Documents
- Word - Insert Text
- Word - Select Text
- Word - Delete Text
- Word - Move Text
- Word - Copy & Paste
- Word - Find & Replace
- Word - Spell Check
- Word - Zoom In-Out
- Word - Special Symbols
- Word - Undo Changes
- Formatting Text
- Word - Setting Text Fonts
- Word - Text Decoration
- Word - Change Text Case
- Word - Change Text Color
- Word - Text Alignments
- Word - Indent Paragraphs
- Word - Create Bullets
- Word - Set Line Spacing
- Word - Borders and Shades
- Word - Set Tabs
- Word - Apply Formatting
- Formatting Pages
- Word - Adjust Page Margins
- Word - Header and Footer
- Word - Add Page Numbers
- Word - Insert Page Breaks
- Word - Insert Blank Page
- Word - Cover Pages
- Word - Page Orientation
- Working with Tables
- Word - Create a Table
- Word - Rows & Columns
- Word - Move a Table
- Word - Resize a Table
- Word - Merging Cells
- Word - Split a Table
- Word - Split Cells
- Word - Add Formula
- Word - Borders & Shades
- Advanced Operations
- Word - Quick Styles
- Word - Use Templates
- Word - Use Graphics
- Word - Auto Correction
- Word - Auto Formatting
- Word - Table of Contents
- Word - Preview Documents
- Word - Printing Documents
- Word - Email Documents
- Word - Translate Document
- Word - Compare Document
- Word - Document Security
- Word - Set Watermark
- Word Useful Resources
- Word - Quick Guide
- Word - Useful Resources
- Word - Discussion
- Selected Reading
- UPSC IAS Exams Notes
- Developer's Best Practices
- Questions and Answers
- Effective Resume Writing
- HR Interview Questions
- Computer Glossary
- Who is Who
Auto Correction in Word 2010
In this chapter, we will discuss auto correction in Word 2010. The AutoCorrect feature automatically corrects common typographical errors when you make them. Let us learn how to use the auto correction option available in Microsoft Word 2010 to correct the spelling automatically as you type the words in your documents.
Setting AutoCorrect
The following steps will help to enable the AutoCorrect feature in Microsoft Word.
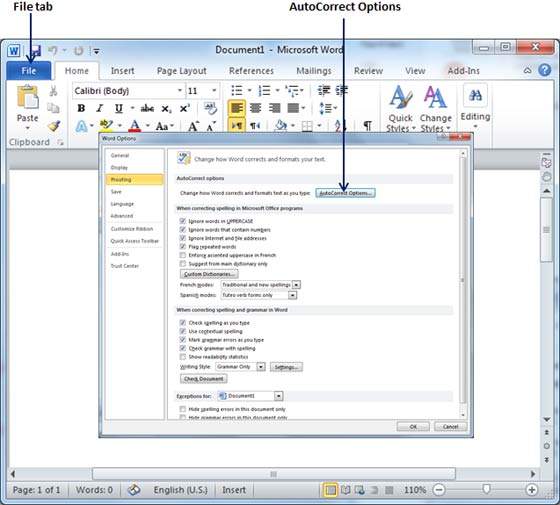
Step 1 − Click the File tab, click Options, and then click the Proofing option available in the left most column, it will display the Word Options dialog box.

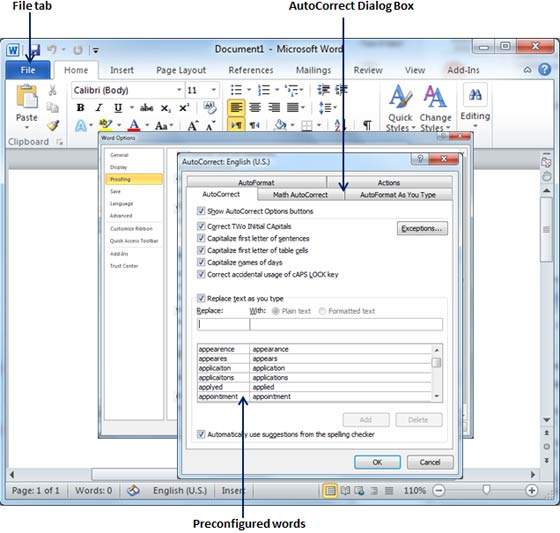
Step 2 − Click the AutoCorrect Options button which will display the AutoCorrect dialog box and then click the AutoCorrect tab. Now you have to make sure all the options are enabled, especially the Replace Text as you type option. It is also recommended to be careful when you turn off an option.

Step 3 − Select from among the following options, depending on your preferences.
| S.No | Option and Description |
|---|---|
| 1 | Show AutoCorrect Options Buttons This option will be used to display a small blue button or bar beneath text that was automatically corrected. Click this button to see a menu, where you can undo the correction or set AutoCorrect options. |
| 2 | Correct TWo INitial CApitals This option changes the second letter in a pair of capital letters to lowercase. |
| 3 |
Capitalize first letter of sentences This option capitalizes the first letter following the end of a sentence. |
| 4 |
Capitalize first letter of table cells This option will be used to capitalize the first letter of a word in a table cell. |
| 5 |
Capitalize names of days This option will be used to capitalize the names of the days of the week. |
| 6 |
Correct accidental usage of cAPS LOCK key This option will be used to correct capitalization errors that occur when you type with the CAPS LOCK key depressed and turns off this key. |
| 7 |
Replace text as you type This option replaces typographical errors with the correct words as shown in the list beneath it. |
| 8 |
Automatically use suggestions from the spelling checker This option tells Word to replace spelling errors with words from the dictionary as you type. |
Although Word comes preconfigured with hundreds of AutoCorrect entries, you can also manually add entries using the following dialog box and use the Replace and With text boxes to add more entries. I added an entry for Markiting which should be replaced with Marketing. You can use the Add button to add multiple entries.
Step 4 − Click OK to close the AutoCorrect Options dialog box and again click OK to close the Word Options dialog box. Now try to type Markiting and as soon as you type this word, Microsoft Word autocorrects it with the correct word Marketing word.
