
- MS Word Basics
- Word - Home
- Word - Getting Started
- Word - Explore Window
- Word - Backstage View
- Word - Entering Text
- Word - Move Around
- Word - Save Document
- Word - Opening a Document
- Word - Closing Document
- Word - Context Help
- Editing Documents
- Word - Insert Text
- Word - Select Text
- Word - Delete Text
- Word - Move Text
- Word - Copy & Paste
- Word - Find & Replace
- Word - Spell Check
- Word - Zoom In-Out
- Word - Special Symbols
- Word - Undo Changes
- Formatting Text
- Word - Setting Text Fonts
- Word - Text Decoration
- Word - Change Text Case
- Word - Change Text Color
- Word - Text Alignments
- Word - Indent Paragraphs
- Word - Create Bullets
- Word - Set Line Spacing
- Word - Borders and Shades
- Word - Set Tabs
- Word - Apply Formatting
- Formatting Pages
- Word - Adjust Page Margins
- Word - Header and Footer
- Word - Add Page Numbers
- Word - Insert Page Breaks
- Word - Insert Blank Page
- Word - Cover Pages
- Word - Page Orientation
- Working with Tables
- Word - Create a Table
- Word - Rows & Columns
- Word - Move a Table
- Word - Resize a Table
- Word - Merging Cells
- Word - Split a Table
- Word - Split Cells
- Word - Add Formula
- Word - Borders & Shades
- Advanced Operations
- Word - Quick Styles
- Word - Use Templates
- Word - Use Graphics
- Word - Auto Correction
- Word - Auto Formatting
- Word - Table of Contents
- Word - Preview Documents
- Word - Printing Documents
- Word - Email Documents
- Word - Translate Document
- Word - Compare Document
- Word - Document Security
- Word - Set Watermark
- Word Useful Resources
- Word - Quick Guide
- Word - Useful Resources
- Word - Discussion
- Selected Reading
- UPSC IAS Exams Notes
- Developer's Best Practices
- Questions and Answers
- Effective Resume Writing
- HR Interview Questions
- Computer Glossary
- Who is Who
Quick Styles in Word 2010
In this chapter, we will discuss how to apply quick styles in Word 2010. Microsoft Word provides a gallery of Quick Styles that you can apply to headings, titles, text, and lists. Quick styles come with canned formatting choices, such as font, boldface, and color which we will understand in this chapter.
Apply Quick Styles
The following steps will help you understand how to apply quick styles to a selected portion of text.
Step 1 − Select a portion of text to which you want to apply some style. Using style, you can change the selected portion of text as a heading or subheading or title of the document. You can try using different styles on your text based on your requirement.
Step 2 − Click the Home tab and then move your mouse pointer over the available styles in the Style Gallery. You will see that the selected portion of text will change its style based on the selected style. You can display more available styles by clicking the More Style button.
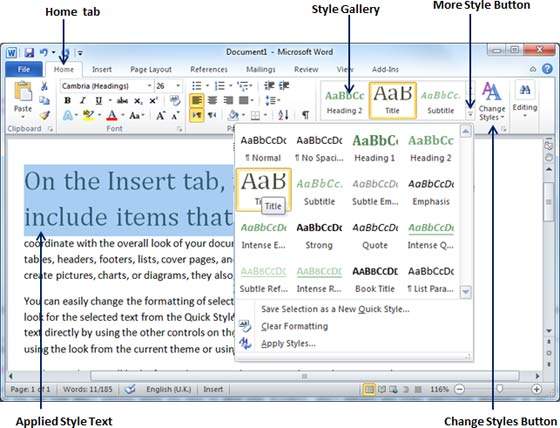
Step 3 − Finally, to apply a selected style, click over the style and you will find that it is has been applied on the selected portion of text.
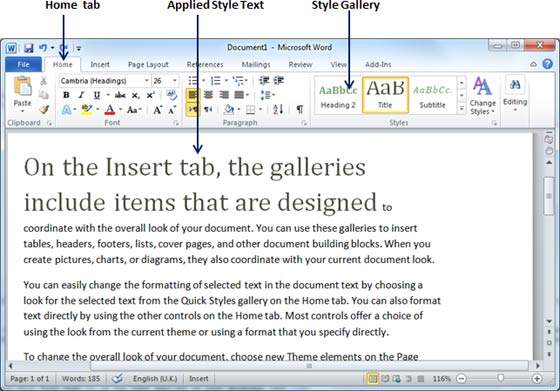
You can bring a text to its normal appearance by selecting the Normal style available in the Style Gallery.
Change Styles
The Change Style function allows you to change the default font, color, paragraph spacing and style set for a document. The following steps will help you change the default style.
Step 1 − Open the document the style of which needs to be changed. Click the Home tab and then click the Change Styles button; this will show you all the options that can be changed. You can change the Style, the Font, the Color and the Spacing of the paragraph.
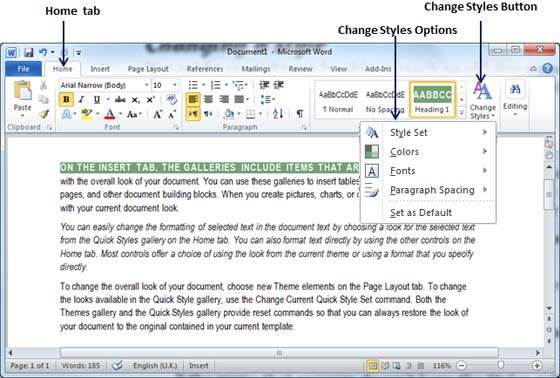
Step 2 − If the style set needs to be changed, click the Style Set option; this will display a submenu to select any of the available style set. When you move your mouse over the different style sets, you will get real time text preview to give an idea about the final result.
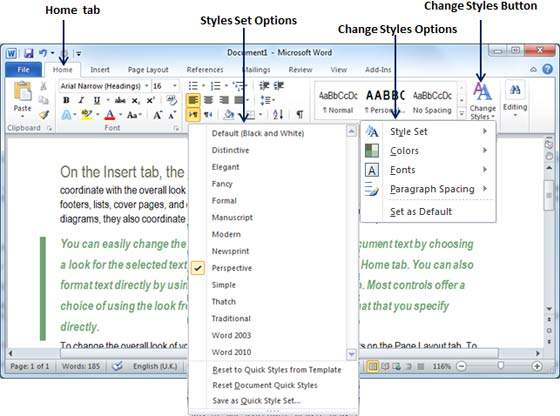
Step 3 − To apply a selected style set, click over the style set and you will find that it is has been applied on your document.
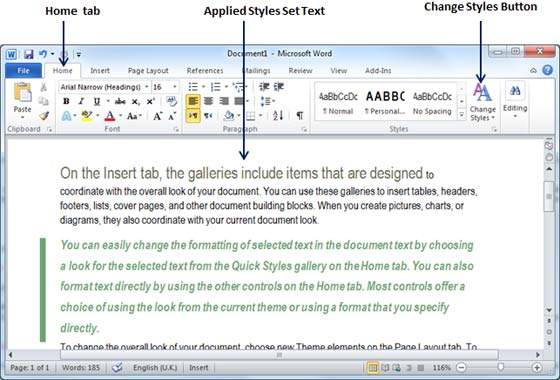
Similarly, you can try applying Font, Color and Paragraph Spacing. You can try these options yourself.
